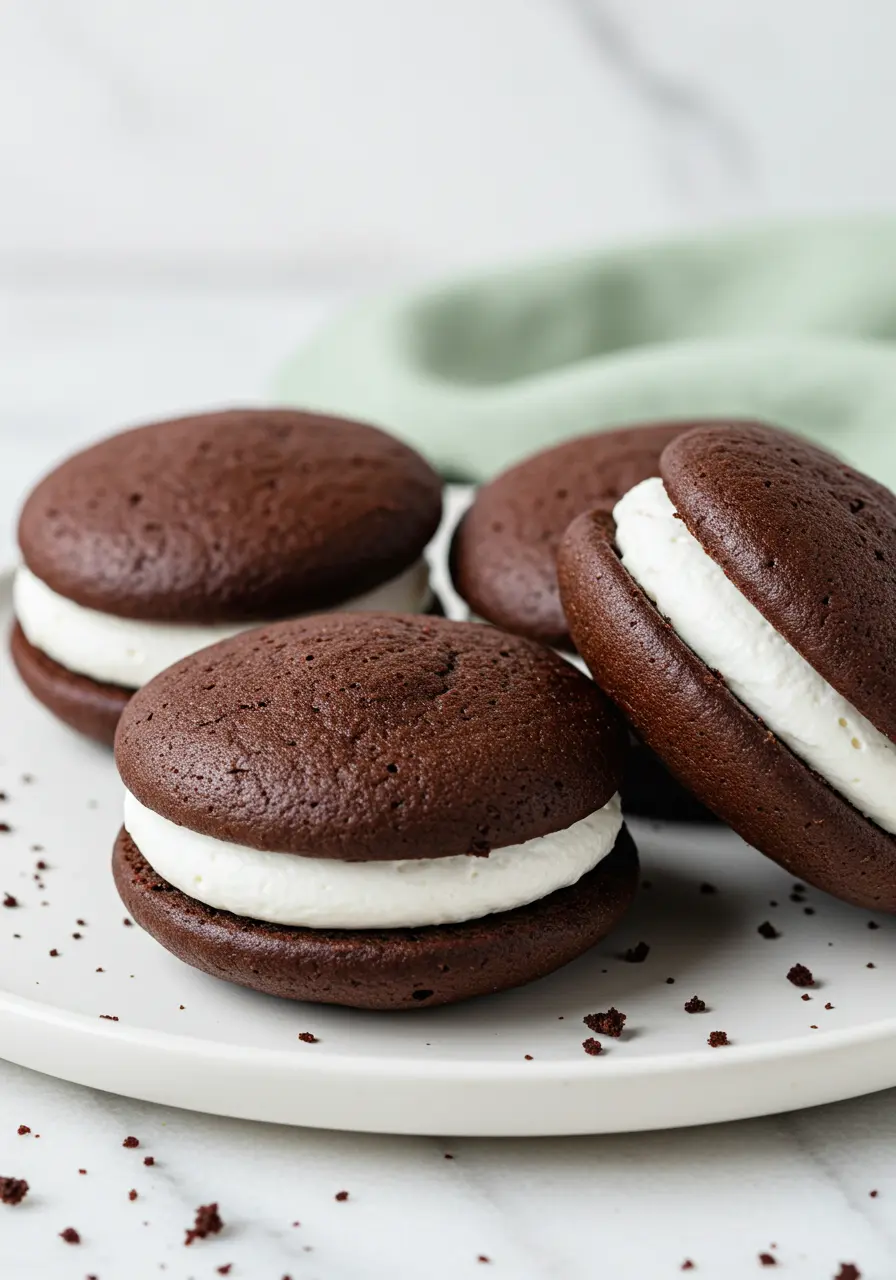
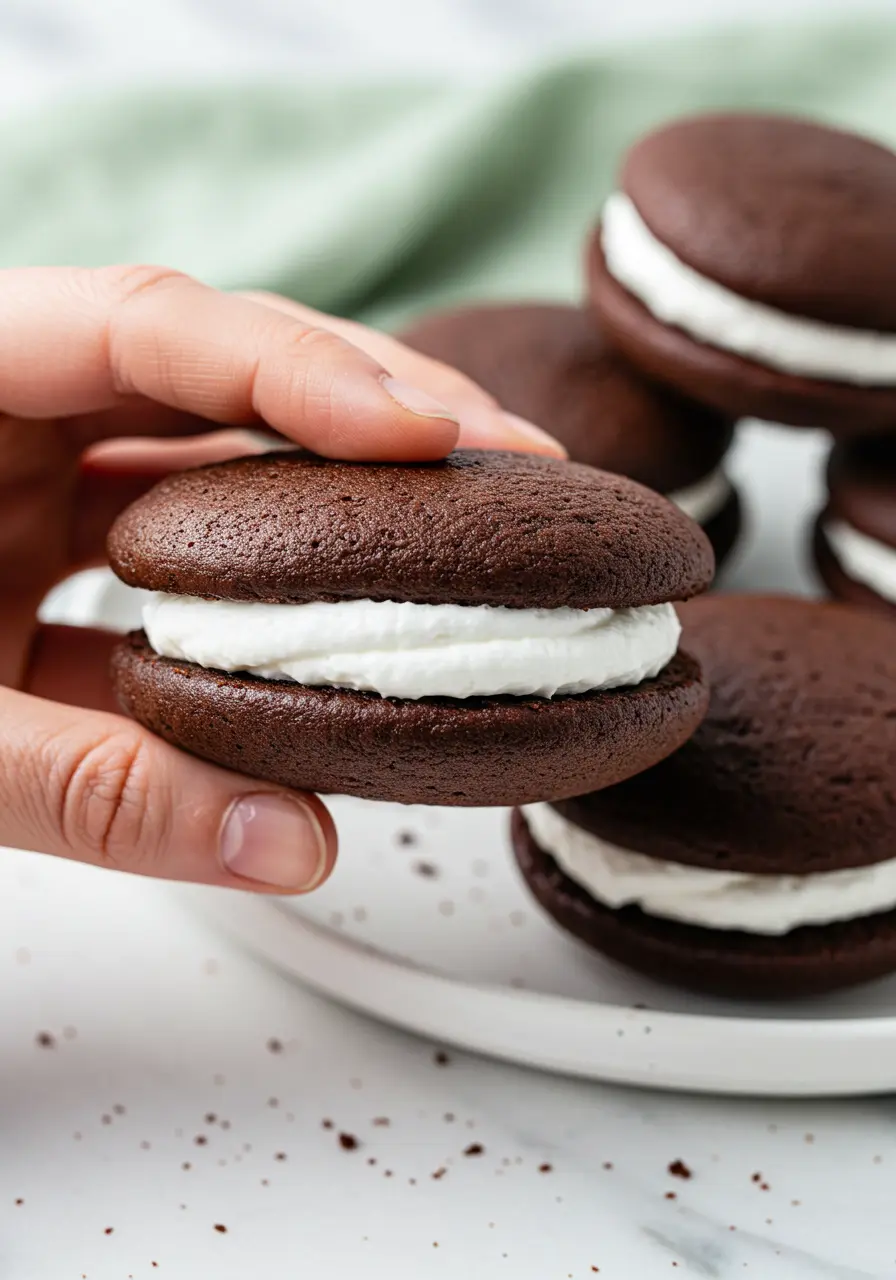
If you’ve never had a proper Whoopie Pie before, let me just say this: it’s like a soft, pillowy cookie hugged by a cloud of marshmallow cream. These chocolate whoopie pies are rich, cakey, and just the right amount of indulgent, without being fussy.
What you’ll love most? They’re the kind of dessert that looks impressive but comes together with simple ingredients and a no-stress method, perfect whether you’re baking for a party or just craving something chocolatey and nostalgic.
This is the Whoopie Pie Recipe you’ll come back to again and again. It’s unfussy, ridiculously good, and customizable if you’re feeling creative.
What Makes These Whoopie Pies So Good
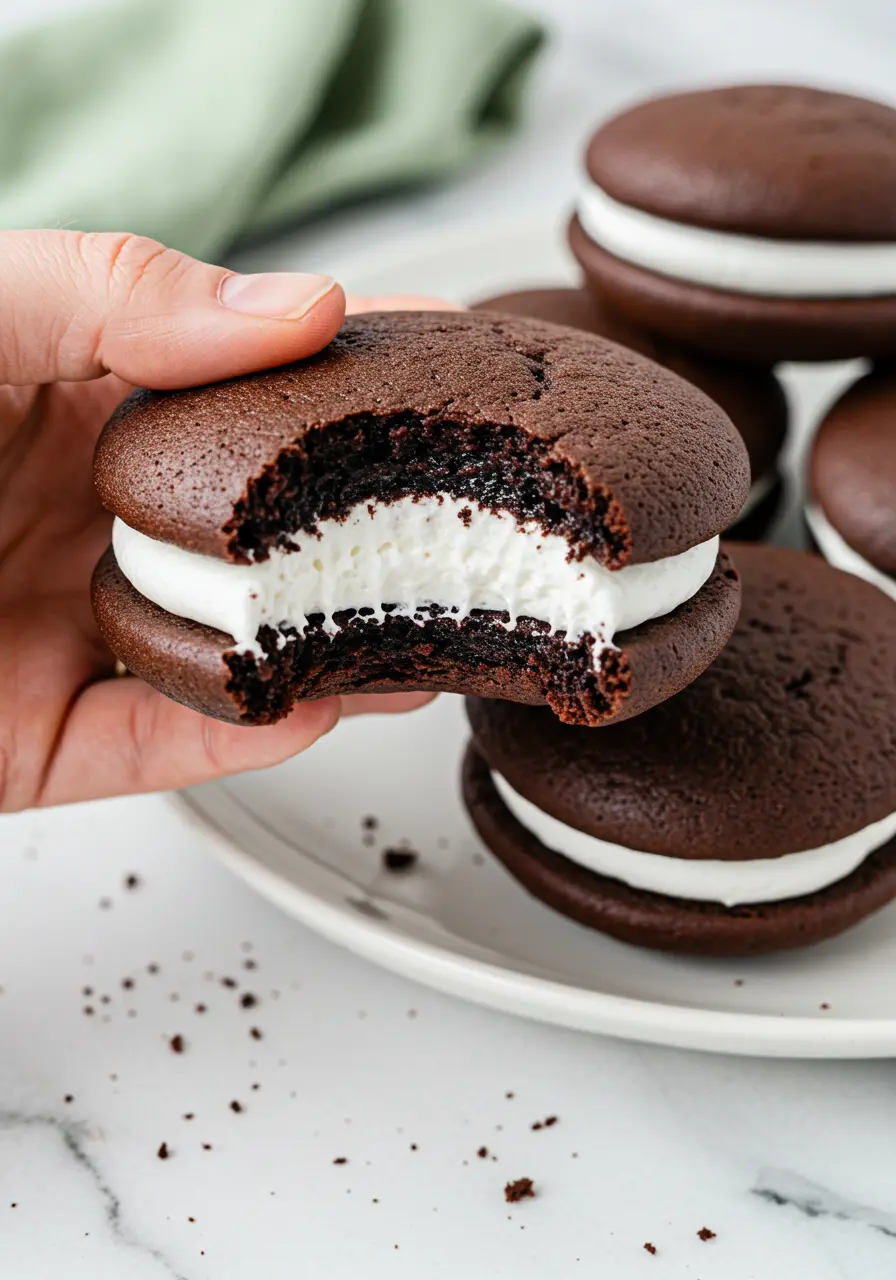
That texture, though. The chocolate cakes are light and springy, not too soft, not too dense. And when you bite in? That filling hits just right. Fluffy. Sweet. Melty.
That filling? Whipped to perfection. Creamy, fluffy, just the right amount of sweet, with a little vanilla to round it out. Honestly, you’ll want to eat it with a spoon.
Balanced sweetness. Thanks to brown sugar, buttermilk, and a pinch of salt, these chocolate Whoopie Pies aren’t cloying. They’re just… perfectly sweet.
Looks fancy, but sooo easy. No layers, no complicated decorating, no stress. Just scoop, bake, and sandwich. You’ll feel like a pro, even on a lazy afternoon.
They’re not cookies. They’re not cake. They’re both. Which means you get the best of both dessert worlds in one handheld treat. No fork required.
The Ingredients You’ll Need
- All-purpose flour: This is your base, I like it because it gives the pies structure without making them heavy.
- Dutch-process cocoa powder: I recommend using this one for a deeper, smoother chocolate flavor, it just tastes more “grown up.”
- Baking soda + baking powder: These work together to lift the batter, it’s best if you use both to get that soft, cake-like texture.
- Salt: Just a little brings out all the sweet flavors, don’t skip it, trust me.
- Espresso powder (optional): I like to add a pinch to boost the chocolate flavor. You won’t taste coffee, just more chocolate.
- Granulated sugar: Keeps things classic, it adds sweetness and helps with structure.
- Brown sugar: For moisture and a hint of that caramel depth. It makes everything a little warmer and cozier.
- Egg + egg yolk: You can stick with one egg, but I recommend the extra yolk, it adds richness and makes the texture super soft.
- Vegetable oil: I like oil here instead of butter, it keeps the pies moist for days.
- Vanilla extract: A little splash gives warmth and rounds everything out.
- Buttermilk: It’s best if it’s at room temp, this adds a slight tang and helps the cakes stay tender.
- Salted butter: I prefer salted, it balances the sweetness without needing to add more salt later.
- Powdered sugar: You can adjust this depending on how sweet you like your filling, but I keep it on the lighter side.
- Marshmallow fluff: This is the fun part, sweet, sticky, and essential to the classic whoopie pie vibe.
- Heavy cream: Just a touch to loosen the filling.
How to Make Chocolate Whoopie Pies
1. Warm up the oven and prep like a pro
Kick things off by setting your oven to 350°F (175°C). Line your baking sheets with parchment paper, this is non-negotiable. You want those cakes to slide right off without a fight, because no one has time for crumbly heartbreak.
2. Get your wet crew ready
In your bowl, whisk your sugars, oil, eggs (yes, that extra yolk is your secret weapon), and vanilla extract until it’s smooth like butter (well, oil, but you get me). Then fold in your room-temp buttermilk (just the half), this little tang brings the softness that’ll have everyone hooked.
3. Mix your dry squad
Grab a big bowl and whisk together your flour, Dutch-process cocoa powder, baking soda, baking powder, salt, and that sneaky espresso powder if you’re feeling fancy. This dry mix is where the magic starts, getting everything evenly cozy.
4. Marry the wet and dry, but play it cool
Introduce the wet components to the dry, whisking with care to initiate a smooth integration. Then add the rest of your buttermilk and fold everything together just until combined, no overachieving here! That imperfect, lumpy texture means you’re doing it right, resist the urge to overmix. You want tender, not tough.
5. Scoop out the love
Scoop out the batter using a tablespoon or cookie scoop and drop generous mounds, roughly two tablespoons each, onto your parchment-lined baking sheets. I’m not picky here, a little uneven is cute. Just leave some space between each, these babies spread and puff up like they’re getting ready for the spotlight.
6. Bake with your eyes open
Pop your trays in and bake for 10 to 11 minutes. Peek around the 9-minute mark and test the centers: give a gentle poke, it should spring back, and if you do the toothpick test, expect a few moist crumbs but no raw batter.
Once they’re out, transfer to a wire rack and let them chill. This step is key.
7. Butter up
Throw your salted butter into a bowl and beat until silky smooth, no lumps, no excuses. This is the base of your dreamy filling, so don’t rush it.
8. Sweeten the deal
Gradually add powdered sugar and keep beating until the whole thing is light and fluffy.
9. Fluff it up
Add marshmallow fluff and start with 1 tablespoon of heavy cream, beating until you get a dreamy, spreadable consistency. If it feels thick, add a bit more cream, we want cloud-like, not glue. Finish with vanilla extract to make those flavors sing.
10. Sandwich those beauties
Take half your chocolate whoopie pies, spread or pipe that glorious marshmallow filling, then gently press another cake on top. Don’t stress if they’re not perfect, that homemade vibe is part of the charm.
Mistakes to Avoid When Making Whoopie Pies
Don’t skip the cooling step
I know it’s tempting to dive right in, but trust me, warm pies plus marshmallow filling equals a gooey, messy disaster. Let them cool fully on a wire rack so your sandwiches stay neat and perfect every time.
Be gentle when assembling
Whoopie pies are delicate. Pressing too hard when sandwiching can squish the filling out and ruin their shape, treat them like the little treasures they are!
Avoid rushing the filling
Take your time beating the butter and sugar. A well-whipped filling isn’t just fluff, it’s the heart of your whoopie pies. Patience here pays off big time.
Avoid using cold buttermilk straight from the fridge
Cold buttermilk can shock your batter, leading to clumps or uneven texture. I like to warm it just slightly, like a cozy bath for your ingredients.
Don’t use old baking powder or soda
Freshness matters! Old leavening agents lose their power, and your pies won’t rise right. If it’s been sitting in your pantry forever, toss it and get new stuff.
How to Store Whoopie Pies
Room Temp (for 1–2 days):
Arrange in a single layer inside an airtight container, using parchment between layers to avoid sticking.
Fridge (up to 5 days):
Chill them if your kitchen’s warm, just let them sit out for 10–15 minutes before serving so the filling softens up again.
Freezer-Friendly (up to 2 months):
Wrap each whoopie pie individually in plastic wrap, then pop them all in a zip-top freezer bag. Great for sudden sweet cravings!
If you’re loving these chocolate treats, you’ve got to check out my cozy pumpkin whoopie pies too, same fluffy magic, but with a fall twist that’s perfect for the season!
If you end up baking these chocolate whoopie pies, don’t be shy, come back and leave a comment! I’d love to know how they turned out for you. Your feedback means a lot.
Frequently Asked Questions
How do I stop the filling from leaking?
Let the cakes cool completely before assembling, and don’t overfill. A little goes a long way! You can also chill the assembled pies for a few minutes to help the filling firm up before serving.
Why did my whoopie pies turn out flat?
This usually happens if your baking soda or baking powder isn’t fresh, or if the batter was overmixed. Always give the batter a gentle hand and make sure my leavening agents are still active before baking.
Can I use natural cocoa powder instead of Dutch-process?
You could, but Dutch-process cocoa delivers a richer, more refined chocolate taste. Natural cocoa is more acidic and might react differently with the leaveners, which could affect texture slightly.
Can I substitute the buttermilk?
Yep, if you’re out of buttermilk, just mix 1 cup of milk with 1 tablespoon of vinegar or lemon juice, let it sit for 5–10 minutes and you’re good to go! It won’t be exactly the same, but it still keeps the cakes moist and tender.

The Best Ever Chocolate Whoopie Pies
Ingredients
Whoopie Pie Ingredients
- ½ cup granulated sugar
- ½ cup brown sugar packed
- ½ cup vegetable oil
- 1 large egg + 1 extra egg yolk
- 1 cup buttermilk
- 1½ teaspoons vanilla extract
- 2 ⅓ cups all-purpose flour
- ½ cup Dutch-process cocoa powder
- ¾ teaspoon baking powder
- 1 teaspoon baking soda
- 1 teaspoon salt
- ¼ teaspoon instant espresso powder optional
Marshmallow Filling
- ½ cup salted butter
- 1⅓ cups powdered sugar
- 1½ cups marshmallow fluff
- 1 –2 tablespoons heavy cream
- ½ teaspoon vanilla extract
Instructions
- Set your oven to 350°F (175°C) and get your baking sheets ready with a layer of parchment. Trust me, don’t skip this step, it saves your cakes from sticking and makes cleanup way easier.
- In a mixing bowl, whisk together both sugars, the oil, the whole egg and extra yolk, plus vanilla extract until the mixture is nicely combined and smooth. Then stir in just half of your buttermilk, this helps everything blend easily and gives the batter that rich, soft texture later on.
- In another bowl, whisk your dry ingredients: the all-purpose flour, Dutch-process cocoa powder, baking soda, baking powder, salt, and that pinch of espresso powder if you’re using it. Mix until everything looks evenly combined.
- Combine the wet and dry ingredients by pouring and whisking softly. Incorporate the leftover buttermilk with gentle folds, taking care not to overwork the batter. A few lumps are totally fine, they’ll bake out beautifully.
- Use a tablespoon or cookie scoop to portion the batter onto your prepared sheets, around 2 tablespoons per whoopie. Try to leave enough space between each one, since they’ll spread and puff up a bit while baking.
- Slide them into the oven and bake for 10 to 11 minutes. You’ll see they’re ready once the middle springs back with a light touch. You can also check with a toothpick, you’re looking for moist crumbs, not raw batter.
- Once they’re baked, transfer them to a wire rack and let them cool down completely. For the filling, beat the salted butter in a bowl until it’s completely smooth and fluffy. Slowly add in the powdered sugar and keep beating until everything looks light and well blended.
- Next, add the marshmallow fluff and 1 tablespoon of heavy cream, then beat again until the filling is airy and spreadable. If it’s too thick, you can add a bit more cream to loosen it up.
- Stir in the vanilla extract for that little extra flavor boost. Now, take half of your cooled cake rounds, spread or pipe a generous layer of filling on the flat side, and gently sandwich another cake on top. Enjoy!
Notes
- Got leftover filling? Don’t toss it, it’s amazing when swirled into hot cocoa or spread on graham crackers.
- Want a neater look? Pipe the filling onto the surface using a round-tipped bag for smooth swirls.
- Baking in warm weather? Let the filled pies chill in the fridge for 20 minutes so they hold up better.