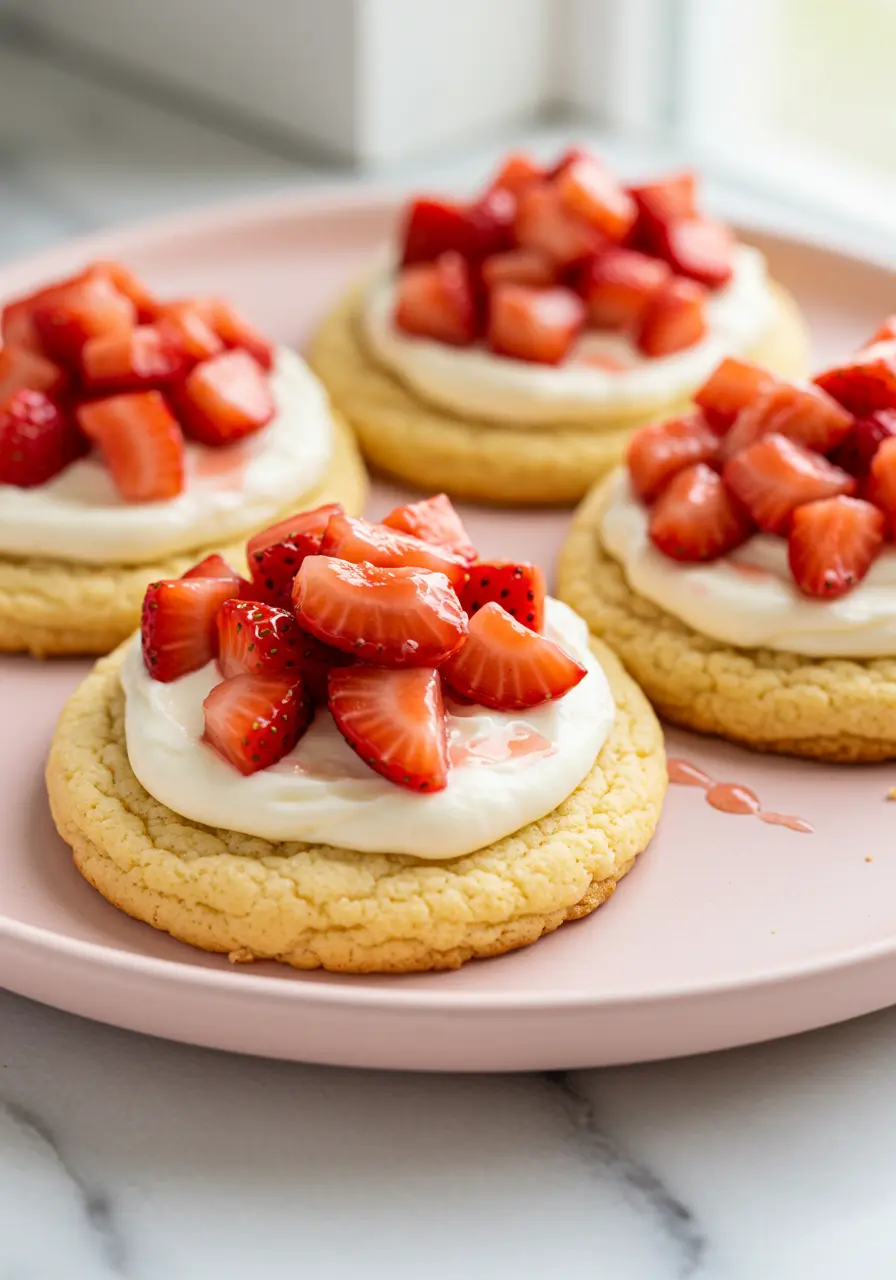
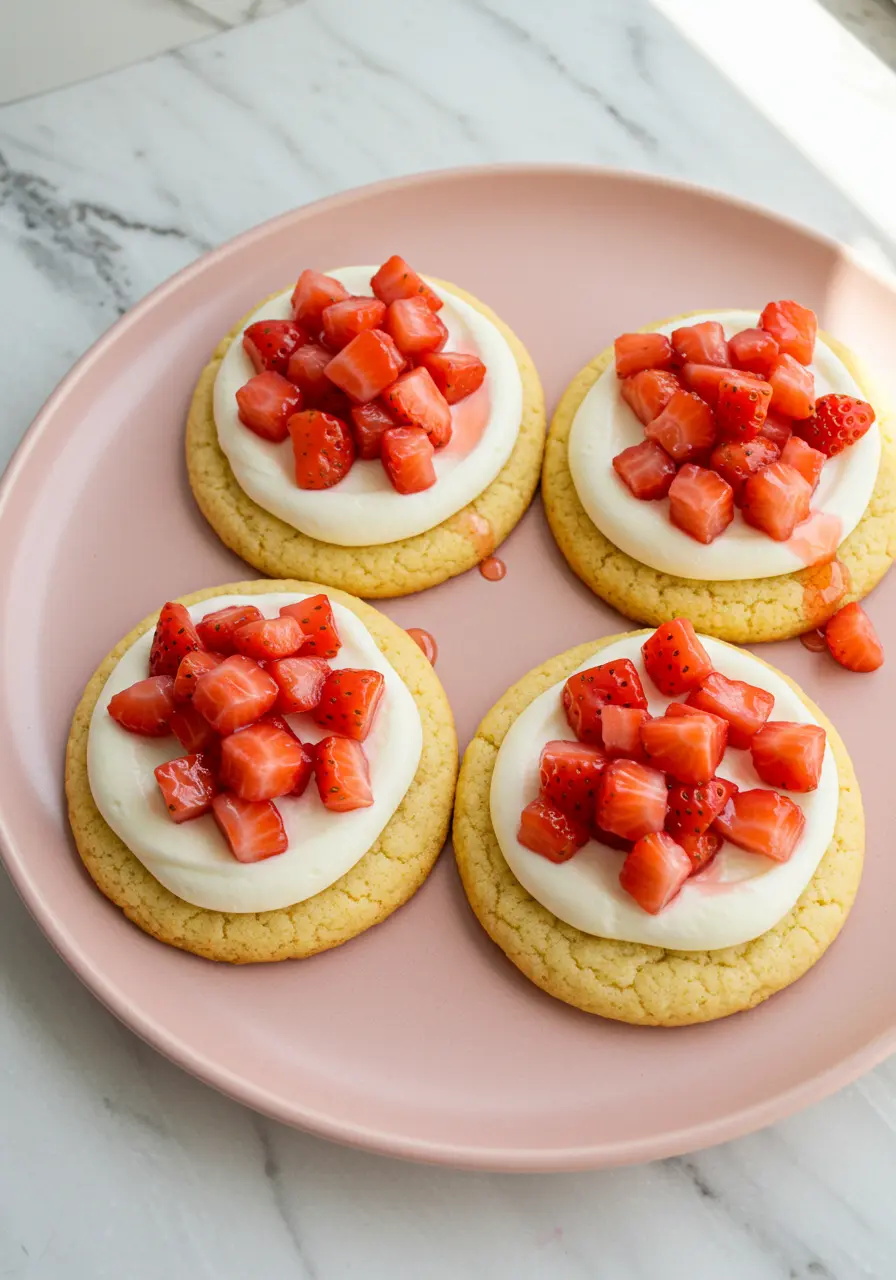
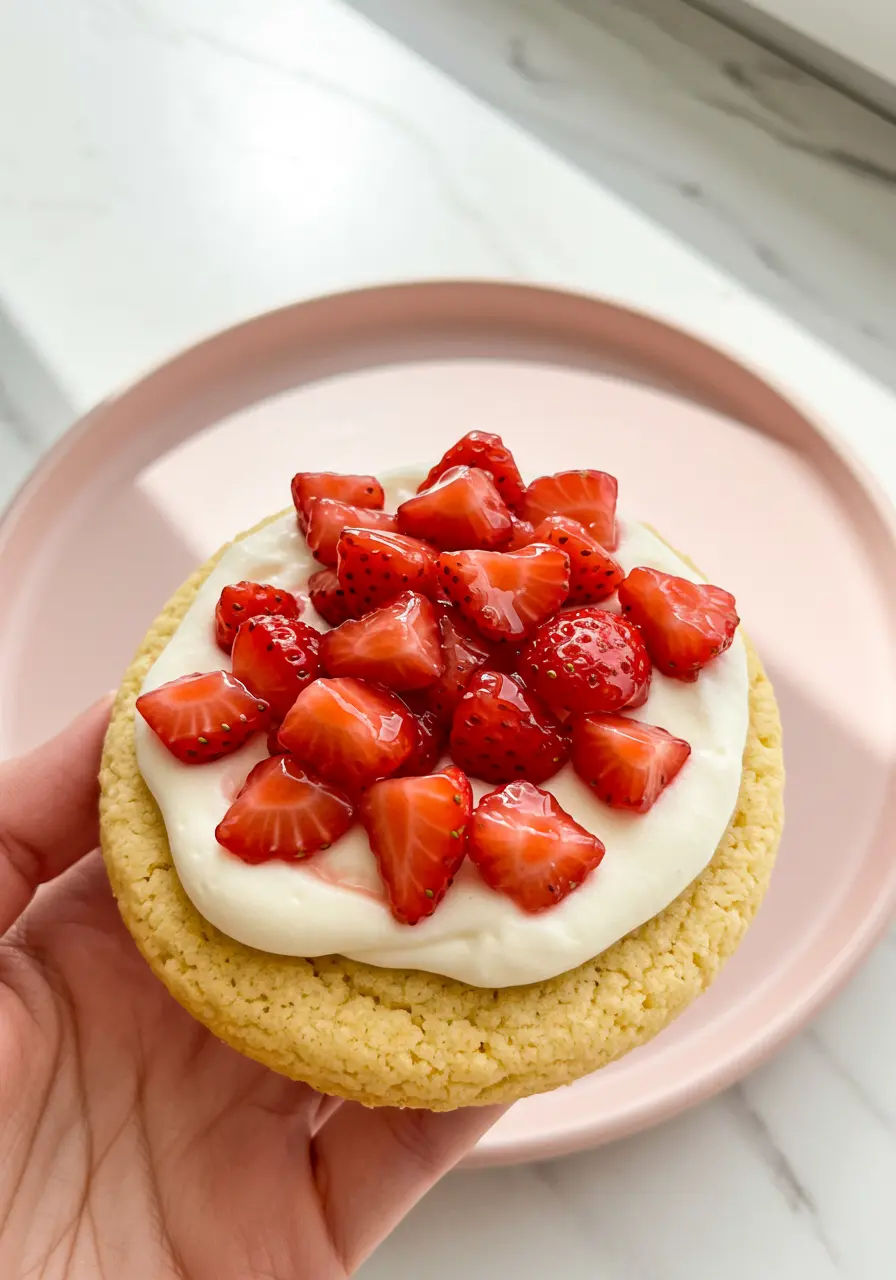
Imagine biting into a cookie that’s as comforting as your favorite childhood memory, but with a twist. These Strawberry Shortcake Cookies are exactly that.
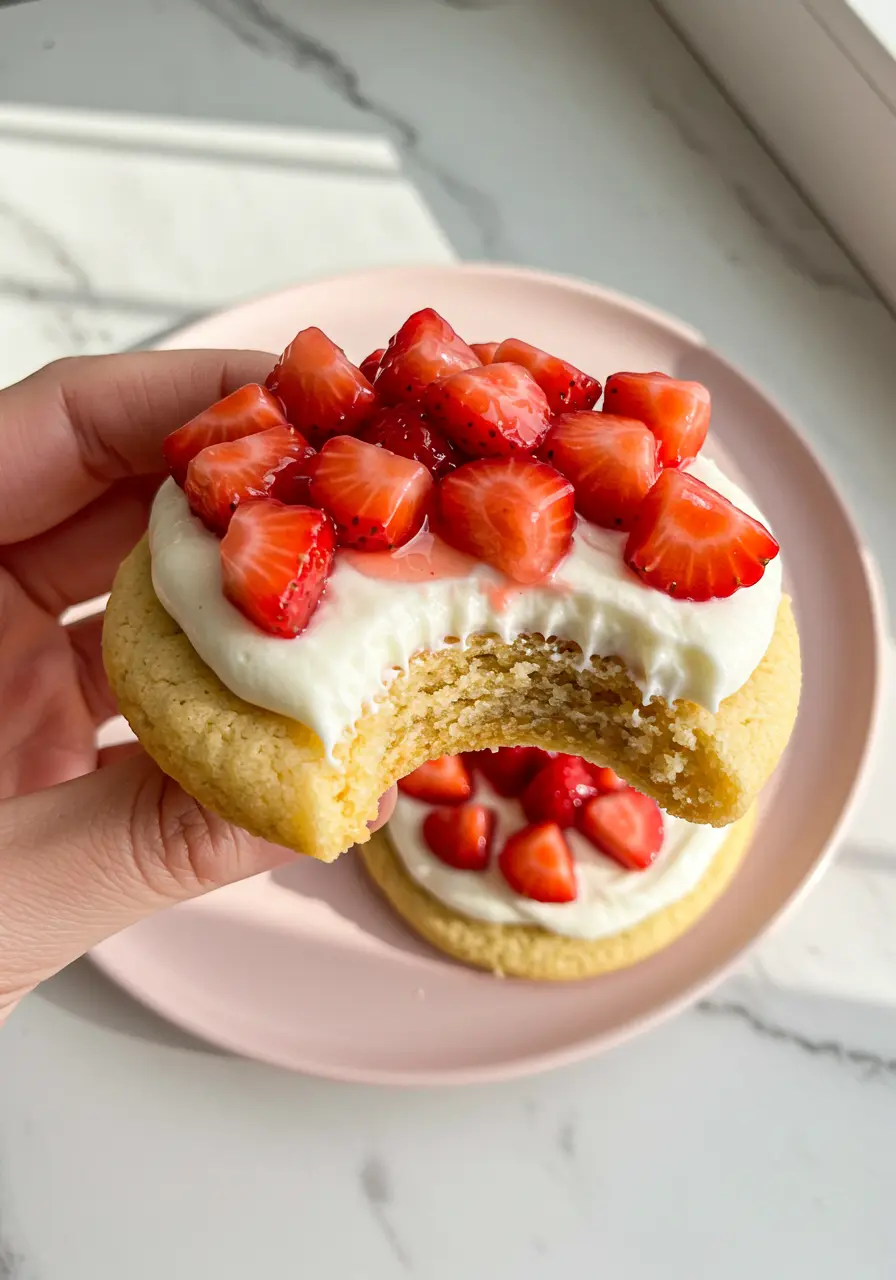
Soft, vanilla cookies that melt in your mouth, topped with creamy frosting and bursts of fresh strawberry goodness. It’s like holding summer in your hand.
I’ve always loved the taste of strawberry shortcake, but there’s something about turning that classic into a cookie that just feels right.
These strawberry cookies are perfect for when you want to feel fancy without the fuss. No plates, no forks, just pure, simple joy with every bite.
Why You’ll Love These Strawberry Shortcake Cookies
Impress Your Friends: Perfect for gatherings, bake sales, or just treating yourself. These cookies look like they came from a bakery, but they’re so easy to make you’ll feel like a pro baker.
Perfect for All Ages: Kids, adults, grandmas, and everyone in between will love them. There’s something universally comforting about this flavor combination, it’s one of those treats that brings people together.
Texture That’ll Make You Say “Wow”: The cookie is soft and chewy, the frosting is creamy and dreamy, and those fresh strawberries? They pop with juiciness. It’s the perfect bite that keeps you coming back for more. It’s like biting into a cloud of strawberry goodness.
How to Make Strawberry Shortcake Cookies:
Whip Up the Butter and Sugar
Start by getting cozy with your butter, brown sugar and granulated sugar. In a bowl of your stand mixer, combine the softened butter and granulated sugar. Mix them together for about 2 minutes, or until they’re creamy and fluffy.
You want it light and airy, this is your cookie base, so make it count! If you’re mixing by hand, grab your whisk and put some elbow grease into it. We’re aiming for that dreamy, soft texture.
Add the Egg and Vanilla Love
Crack in your egg and add that splash of vanilla extract, this is where the magic happens. Keep mixing until everything’s beautifully combined. You’ll notice the dough starting to come together into a smooth, creamy base. Don’t rush this; let those flavors meld together.
Mix in the Dry Ingredients
Now, in a separate bowl, whisk together the flour, cornstarch, baking powder, and salt.
Slowly add this dry mixture into your wet mixture, stirring just until it comes together. You don’t need to overmix, once it’s combined, stop. The dough should feel thick and slightly tacky, but not too runny.
Chill the Dough
Here comes the waiting game, wrap your dough in some plastic wrap and let it rest in the fridge for at least 1 hour (but up to 1 day if you’ve got the time!).
Chilling the dough is going to help your cookies hold their shape when they bake, and it also gives the flavors time to really mingle. Trust me, the waiting is worth it.
Preheat and Prep Your Space
Bring your oven up to 350°F (175°C) so it’s hot and ready for baking. Line your baking sheets with parchment paper (this is your secret weapon to keep the cookies from sticking). It’s all about setting yourself up for a smooth bake!
Scoop and Shape the Dough
Now, when you’re ready to bake, grab a cookie scoop (or use a tablespoon) and scoop the dough into little 1-inch balls.
Place each one on the baking sheet with a 2-inch gap to ensure even baking.
Carefully press down on each ball, just enough to flatten them slightly, with a spoon or your fingers. We’re going for that classic round shape, but don’t flatten them too much, let the dough do its thing in the oven.
Bake Until Golden Perfection
Pop the cookies into your preheated oven and bake them for about 10-12 minutes.
They’re ready when the edges turn lightly golden and the centers appear firm and set.
Keep a close eye on them so they don’t get too crunchy. If you’re unsure, just peek at the edges, they should look slightly crisp while the middle stays soft.
Cool and Get Ready to Frost
Once they’re finished, allow the cookies to cool on the baking sheet for about five minutes before moving them.
This helps them firm up. Let them rest on a wire rack to cool fully and set to perfection. The waiting part again, deep breaths, they’re almost ready!
Whisk Together the Cream Cheese Frosting
While your cookies are cooling, let’s get started on that frosting that will turn these treats from tasty to spectacular.
Combine the softened cream cheese and butter in a medium bowl, beating until the texture is silky and smooth.
Gradually add the powdered sugar and vanilla extract, and beat until it’s all blended together into a fluffy, dreamy frosting.
Make the Strawberry Topping
Cut the strawberries into tiny pieces, then mix them with honey and a dash of lemon juice for extra flavor. Give them about 10 minutes to sit and release all that delicious, natural moisture.
Once they’ve gotten nice and juicy, carefully drain off any extra liquid, this prevents the cookies from getting soggy. You want that fresh strawberry burst without the mess!
Assemble the Cookies
Now for the fun part! Grab your cooled cookies and slather on a rich layer of cream cheese frosting. Don’t hold back, it’s the creamy goodness that makes these cookies so special!
Once the frosting’s on, top each cookie with a spoonful of your strawberry topping. Just a little burst of fresh, juicy sweetness to complete the magic. Enjoy!
3 Key Missteps to Avoid
#1- Overmixing the Dough
You want soft, tender cookies, right? Overmixing your dough will create dense, tough cookies, nobody wants that!
Once your dry ingredients are added to the wet mixture, mix just until everything comes together. The dough should still look a little soft and slightly sticky, but not overly mixed.
#2- Not Measuring Flour Correctly
Flour is sneaky, it can pack down in your measuring cup, which means you might be adding too much to your dough if you’re not careful.
Scoop the flour into the measuring cup, then gently level it with a knife for the perfect amount. This ensures the right amount, preventing your cookies from turning out too dry or crumbly
#3- Not Using Parchment Paper or a Silpat Mat
Sure, you could bake your cookies directly on the baking sheet, but why risk it? Parchment paper (or a reusable Silpat mat) is your best friend for a reason. It prevents the cookies from sticking, helps them bake evenly, and makes cleanup a breeze.
How to Store Your Strawberry Shortcake Cookies
If you store the cookies frosted: They’re best kept in the refrigerator in an airtight container. The cream cheese frosting will stay fresh, but the cookies might soften a bit. Just be sure to let them come to room temperature for a few minutes before serving, so the frosting firms up slightly.
If you store the cookies unfrosted: You have more flexibility. Keep them in a sealed container at room temperature for up to 3 days, or freeze them for up to 3 months for longer storage. This way, you can frost them just before serving, keeping the cookies and frosting fresh!
More Strawberry Recipes to Try

Strawberry Shortcake Cookies: Soft, Sweet, and Easy to Make
Ingredients
Cookie Base
- ½ cup 115g unsalted butter, softened
- ¼ cup brown sugar
- ½ cup granulated sugar
- 1 large egg room temperature
- 2 teaspoons vanilla extract
- 1 ½ cups 190g all-purpose flour (spooned and leveled)
- 1 teaspoon baking powder
- 1 teaspoon cornstarch
- ¼ teaspoon salt
Cream Cheese Frosting
- 4 oz 113g cream cheese, softened
- 1 ½ cups 180g powdered sugar
- 2 tablespoons 28g unsalted butter, softened
- 2 teaspoons vanilla extract
Fresh Strawberry Topping
- 1 cup finely diced strawberries
- 1 teaspoon lemon juice
- 1 tablespoon honey
Instructions
- Start by creaming softened butter, brown sugar and granulated sugar together in your stand mixer. Beat on medium speed for around 2 minutes, until the mixture is light, fluffy, and creamy.
- Next, crack in the egg and add vanilla extract. Continue mixing until everything is fully combined and the mixture turns smooth and creamy.
- Whisk the flour, cornstarch, baking powder, and salt together in another bowl. Slowly add this dry mix to the wet ingredients and stir until just blended.
- Wrap the dough in plastic wrap and refrigerate for at least an hour, or up to 1 day.
- Set the oven to 350°F (175°C) and cover your baking sheets with parchment paper for a hassle-free cleanup.
- Once the dough is chilled, scoop it into 1-inch balls using a cookie scoop or tablespoon. Set the dough balls 2 inches apart on the baking sheets. Gently flatten each ball using your fingers or a spoon, just enough to shape them slightly.
- Bake for 10 to 12 minutes, until the edges are golden and the centers are firm and set. Keep an eye on them to avoid overbaking, and check that the edges are lightly crisp while the middle stays soft.
- After 5 minutes on the baking sheet, transfer the cookies to a wire rack to cool entirely.
- To prepare the frosting, blend softened cream cheese and butter in a medium bowl until smooth and luscious.
- Slowly incorporate the powdered sugar and vanilla, mixing until the mixture is fluffy and well combined.
- For the strawberry topping, dice fresh strawberries and toss them with honey and lemon juice. Let them sit for 10 minutes to release their juices, then drain off the excess liquid to avoid soggy cookies.
- After the cookies cool, lavish each one with a thick layer of cream cheese frosting.
- Garnish with a generous scoop of the strawberry mixture and savor every bite!
Notes
- Don’t skip chilling the dough, this helps the cookies hold their shape while baking and makes them less likely to spread too much.
- Make sure to drain excess strawberry juice before adding the topping. You don’t want soggy cookies!