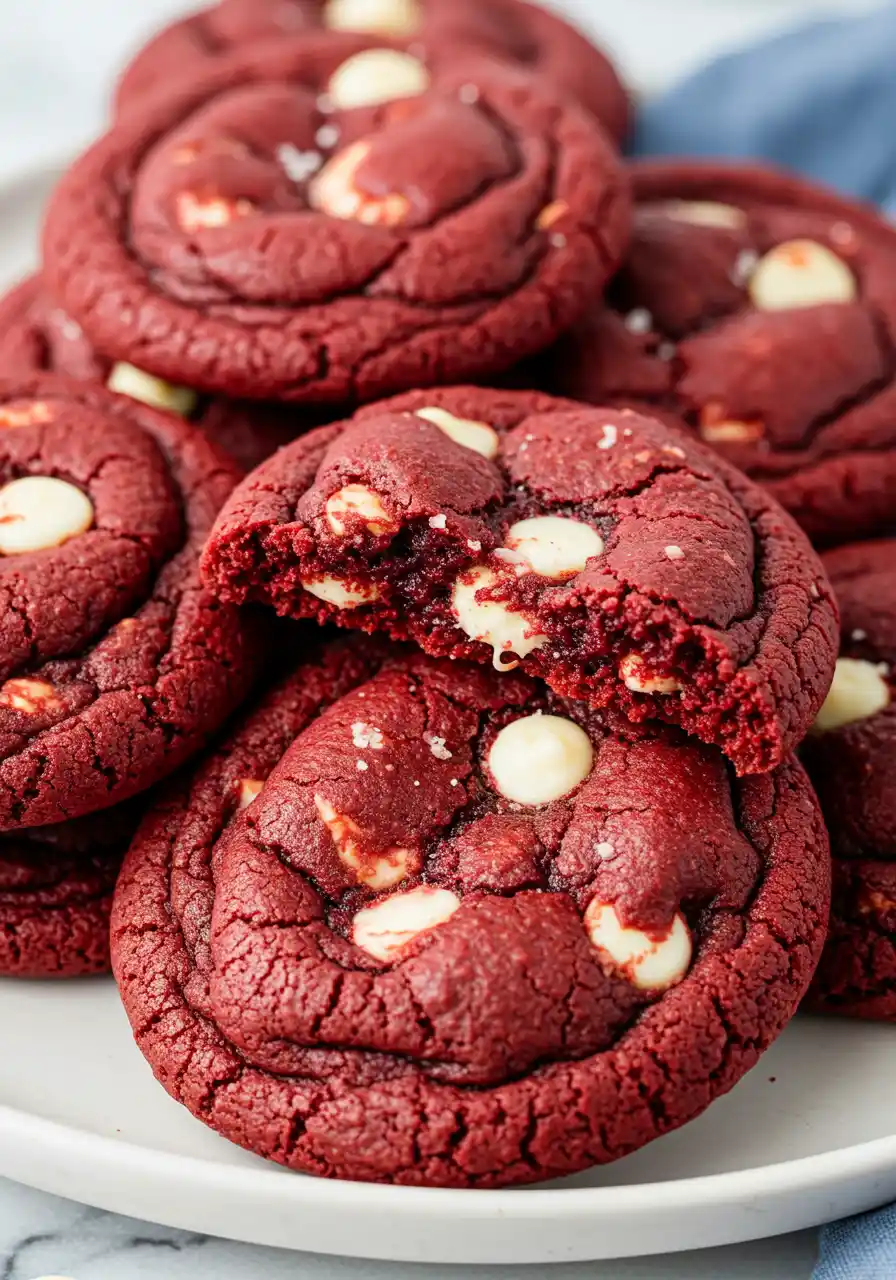
If you’ve ever wondered how to take that classic, show-stopping red velvet cake flavor and turn it into a cookie that’s chewy, soft, and downright addictive, you’re in the right place. This Red Velvet Cookie recipe is exactly what your baking routine has been missing, simple enough for any home baker, yet special enough to wow every single time.
Whether you’re baking for a cozy night in, a festive occasion, or just because life’s too short not to indulge, these cookies hit the perfect balance between rich cocoa, vibrant A bold red color with a hint of sweetness from white chocolate chips. Trust me, once you try this recipe, these Red Velvet Cookies will become your new go-to treat.
What makes these cookies so special
- No complicated steps, just delicious results, even if you’re a beginner baker, this recipe keeps it simple while delivering bakery-quality cookies.
- They’re incredibly versatile, bake a batch for a casual snack, gift them to friends for a heartfelt homemade present, or take them to any celebration and watch them disappear fast.
- The kind of cookie that doubles as a conversation starter, serve these up and watch people’s faces light up with delight. They might start calling you their favorite baker ever!
- Brings the festive vibes all year round, these aren’t just for Valentine’s or Christmas! The bold color and comforting taste make them a feel-good pick-me-up anytime you need a little extra sparkle.
The Ingredients You’ll Need
- All-purpose flour: I always reach for this one, it gives the cookies structure while keeping them nice and soft.
- Dutch-process cocoa powder: I recommend using Dutch-process for that smooth, rich chocolate flavor without any bitterness. Totally worth it.
- Baking soda: Just a little goes a long way to make your cookies rise beautifully and stay chewy in the center.
- Salt: A small pinch, but it makes a big difference! It brings out the sweet and rich chocolate flavors.
- Unsalted butter: I prefer unsalted so I can control the saltiness. Plus, it gives a smooth, buttery flavor we all like.
- Light brown sugar: This adds a lovely hint of caramel and keeps the cookies super soft and chewy. Can’t skip it!
- Granulated sugar: Helps with sweetness and gives those perfect golden edges. You’ll notice the difference.
- Eggs: You’ll want them at room temperature so they mix in smoothly. They help bind everything together like magic.
- Pure vanilla extract: I always say don’t skip the vanilla, it adds warmth and depth that makes the flavor pop.
- Red liquid food coloring: This is how you get that classic red velvet look! A little splash goes a long way.
- White chocolate chips: I love adding these for creamy sweetness in every bite. You can even toss in a few extra on top for a pretty finish!

How I Make These Red Velvet Cookies (And You Can Too)
Step 1: Cream it up
Grab your mixer (hand or stand, whatever you’ve got) and beat the soft unsalted butter, brown sugar, and granulated sugar together until the mixture looks pale and fluffy. You’re going for that smooth, creamy texture that says, yes, this is gonna be good. I usually let it run for about 2–3 minutes. Scrape down the sides if things are sticking!
Step 2: Mix in the good stuff
Crack the eggs, mix with vanilla, then add a swirl of deep red coloring. Keep stirring until you get a smooth, vibrant red dough. Don’t worry if it looks a bit sticky here, that’s normal with red velvet cookie dough.
Step 3: Bring in the dry crew
In a separate bowl, whisk together your flour, Dutch-process cocoa, baking soda, and salt. Add it gradually into your wet mixture, mixing just until combined. Don’t overdo it here.
Step 4: Fold in the magic
Time for those dreamy white chocolate chips. Gently fold them in with a spatula. Save a handful if you want to press a few on top later, it’s not required, but makes them look extra cute.
Step 5: Chill it (you and the dough)
Trust me on this one, pop that dough in the fridge for about 40 minutes or even an hour. It helps everything firm up so your cookies don’t spread into flat pancakes.
Step 6: Scoop and space
Preheat your oven to 350°F (175°C) and line a couple of baking trays with parchment paper. Scoop out your chilled dough, spacing the balls a couple inches apart. They’ll need room to do their thing in the oven.
Step 7: Bake (but don’t overbake)
Bake for 10 minutes. You’re looking for set edges and soft centers. If they still look a tiny bit underdone in the middle, that’s perfect. They’ll finish setting as they cool.
Step 8: Finish with flair
While they’re still warm, press a few extra white chocolate chips on top if you saved some. Not necessary, but always a good move. Let them sit on the tray for a few minutes, then transfer to a wire rack to cool. Or don’t, I won’t judge if you eat one warm.

Red Velvet Cookies Mistakes To Avoid
My cookies came out flat and spread too much
A few things could be at play: the dough might’ve been too warm, or your butter was extra soft. Next time, try chilling the dough a bit longer and make sure your baking sheet isn’t warm from a previous batch.
They’re dry or crumbly
Overbaking is usually the culprit here. Pull them out when the edges look done but the centers are still soft and a little shiny. Also, make sure you’re measuring your flour correctly (spoon and level, don’t scoop!).
My dough is way too sticky.
No stress, red velvet dough is naturally a bit stickier because of the food coloring and moisture from the sugars. I recommend chilling it for at least an hour, or even overnight if you’re planning ahead. A quick tip? Lightly flour your hands or cookie scoop before scooping.
They look raw in the middle
Actually, that’s the sweet spot! These cookies should look slightly underbaked when you pull them out. Let them sit on the tray for 5–10 minutes after baking, they’ll set up and stay soft and fudgy in the center.
What to Serve with Red Velvet Cookies
- Creamy mascarpone or whipped cream: Because a little richness never hurts!
- A cup of rich hot chocolate: Give the chocolatey goodness a little extra kick.
- Zesty orange slices: Bright, fresh, and a perfect contrast to the sweet cookies.
- Salted caramel drizzle: Sweet meets salty in the most irresistible way.
- Cold milk or oat milk: Simple, satisfying, and forever a hit.
Storing Tips for Red Velvet Cookies
Keep your cookies fresh and delicious with these smart storage hacks:
Cool completely before storing: Warm cookies trap moisture and get soggy fast.
- Store in an airtight container at room temperature: They stay fresh for up to 4-5 days.
- Add a slice of bread inside the container: It soaks up excess moisture and keeps cookies soft.
- Freeze for up to 3 months: Use a freezer-safe bag and thaw at room temp for that fresh-baked feel.
- Skip the fridge: It dries cookies out faster than you want!
Made the cookies and craving more? Try my red velvet cupcakes next—they’re like a soft, fluffy sequel to your new favorite treat.
Frequently Asked Questions
Can I swap white chocolate chips for regular chocolate chips?
Absolutely! Using semisweet or dark chocolate chips adds a rich contrast to the sweet, tangy flavor of red velvet.
Is it possible to prepare the dough ahead and freeze it?
Yes! Just scoop the dough into balls, freeze them on a tray, and then pop them into a freezer bag. When you’re ready, bake them straight from frozen, just add a couple extra minutes to the baking time.
What’s a good alternative if I don’t have Dutch-process cocoa?
If you don’t have Dutch-process cocoa on hand, natural cocoa powder works but expect a slightly different flavor and lighter color. You might want to reduce the baking soda slightly because natural cocoa is more acidic.

Red Velvet Cookies That Melt in Your Mouth
Ingredients
Dry Ingredients
- 2¼ cups of all-purpose flour
- 4 tablespoons of Dutch-process cocoa powder
- 1 teaspoon baking soda
- ½ teaspoon fine salt
Wet Ingredients
- ¾ cup unsalted butter
- 1 cup packed light brown sugar
- ¾ cup granulated sugar
- 2 large eggs
- 1½ teaspoons vanilla extract
- 1 tablespoon red food coloring liquid
Mix-Ins
- 1 cup white chocolate chips
Instructions
- Start by beating the softened unsalted butter with the brown sugar and granulated sugar until the mixture is light and fluffy, about 2 to 3 minutes. Don’t forget to scrape down the bowl so everything blends well.
- Next, add the eggs, vanilla, and red food coloring, mixing until the dough turns smooth and glossy.
- In another bowl, whisk together the flour, Dutch-process cocoa, baking soda, and salt. Gradually add this dry mix to the wet ingredients, stirring just until combined, avoid overmixing.
- Fold in the white chocolate chips, saving a few to press on top later if you like.
- chill the dough for 40 minutes to an hour to keep your cookies from spreading too much.
- Set the oven to 350°F and prep pans with parchment paper. Shape and place the dough balls on the trays.
- Bake for about 10 minutes, until the edges are set but the centers still look soft. While warm, press extra white chocolate chips on top if you want.
- Let the cookies cool a bit on the tray, then transfer to a wire rack, or just enjoy them warm!
Notes
- For a good rise, make sure your baking soda is fresh.
- For extra flavor, try adding a pinch of cinnamon or espresso powder.
- Avoid opening the oven too often, as this can cause temperature drops and affect your baking.