Okay, real talk, have you ever made something so cute you almost didn’t want to eat it… but then you did, and it was completely worth it? Yeah, that’s exactly what happens with these Pumpkin Cake Pops.
They’re everything you love about fall, warm spice, soft pumpkin cake, a cozy pop of color, all packed into one sweet, bite-sized treat. No forks. No plates. Just grab, bite, and try not to go back for a third (good luck with that).
These are the laid-back, no-stress version. Super simple to pull together, surprisingly forgiving, and yes, they totally deliver that “wait, you made these?!” moment.
Whether you’re planning some fall cake pops for a party, or need a fun little dessert for your Thanksgiving dessert table, this recipe’s got you.
What Makes These Pumpkin Cake Pops So Good
Customizable to your heart’s desire: Swap the candy melts, sprinkle on some edible glitter, or even add a dash of secret spice. Make it yours.
Mess-free magic: No forks, no plates, no sticky hands, just grab a stick and enjoy the party.
Kid-approved and adult-loved: Sweet, spiced, and downright addictive, a treat everyone will fight over.
Foolproof texture: With cream cheese frosting holding everything together, these cake pops stay perfectly structured yet melt-in-your-mouth tender.
Perfect portion control: Individual cake pops satisfy sweet cravings without overdoing it.
The Ingredients You’ll Need
- Yellow Cake Mix: I like using this because it makes the whole process quick and super reliable, plus it gives a soft, fluffy texture.
- Whipped Cream Cheese Frosting: This is the secret glue, it binds everything perfectly and adds a creamy tang. You can’t really skip it!
- Water: It’s best if you use water to keep the cake moist and help everything blend smoothly.
- Vegetable Oil: I recommend this for extra moisture without making the cake heavy.
- Eggs (plus an extra yolk): Eggs hold everything together, and maybe that extra yolk gives it a little richer, velvety touch.
- Vanilla Extract: I like to add a splash to warm up all the flavors, it’s a subtle but important step.
- Pumpkin Puree: This is the star! Both fresh and canned work.
- Ground Cinnamon: I always reach for cinnamon because it infuses that comforting fall flavor we can’t resist.
- Ground Ginger: Maybe a little zing is just what the pumpkin needs to brighten the flavor.
- Nutmeg: I recommend a small pinch for that cozy, almost sweet background note in the spice mix.
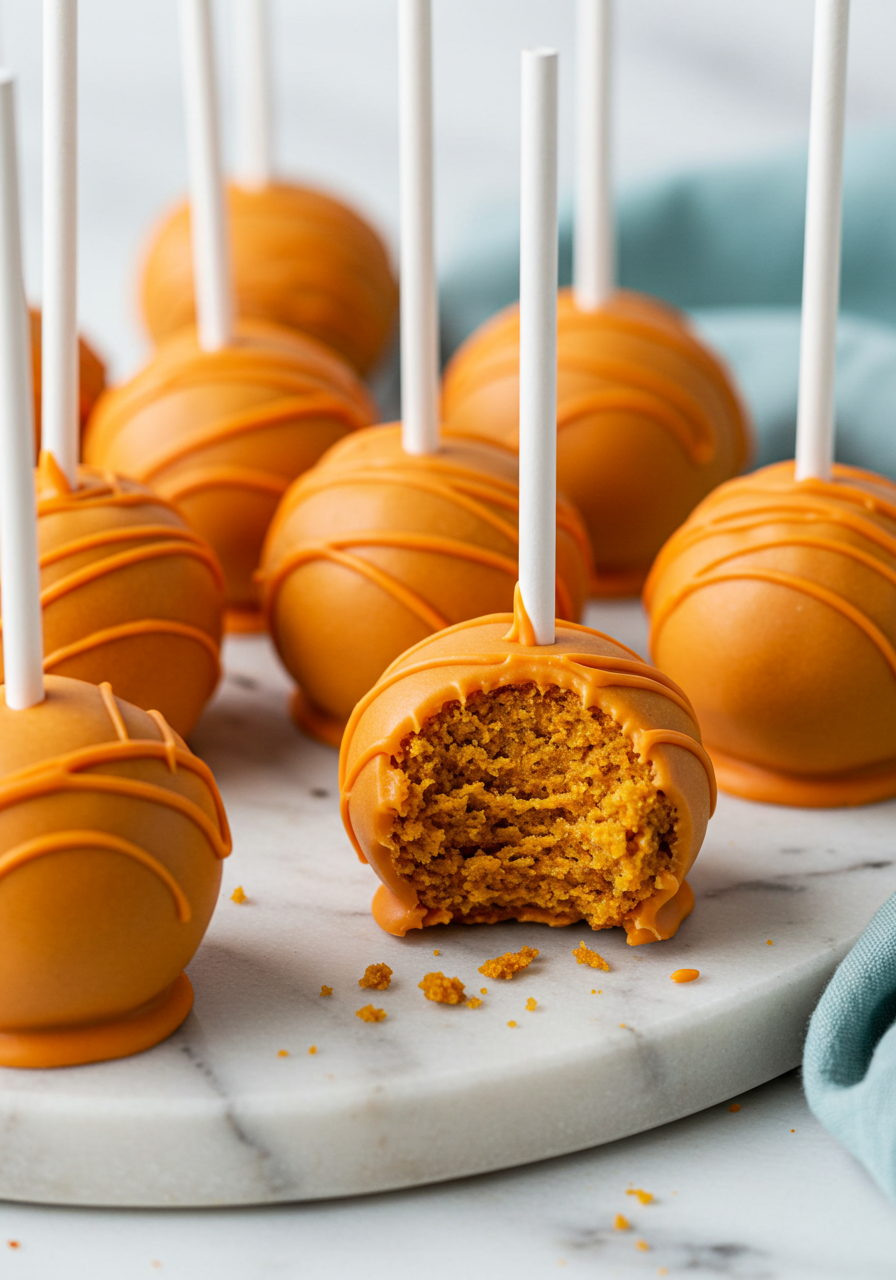
- Orange Candy Melts: I like these for the festive color and smooth coating, but you can swap them out if you want a different look or flavor.
How to Make Pumpkin Cake Pops
Step 1: Mix it up with love
Grab a big mixing bowl and toss in your yellow cake mix, water, vegetable oil, eggs plus that extra yolk, pumpkin puree, and your cozy trio of spices, cinnamon, ginger, and nutmeg. Don’t forget a splash of vanilla extract! Keep stirring until the mixture turns perfectly smooth and creamy. You want a batter that’s thick, pumpkiny, and ready to become magic.
Step 2: Bake your fall dreams
Spread that gorgeous batter into a parchment-lined or greased pan and send it off to bake. Bake for about 23 minutes, you’re looking for that perfect spring-back when you gently poke the cake. While it’s baking, maybe do a little happy dance, you’re one step closer! Then, let it cool completely. No rushing this part.
Step 3: Crumble and combine like a pro
Once the cake is fully cooled (I mean, cold enough not to melt your frosting), crumble it into fine crumbs. Now fold in your whipped cream cheese frosting and mix until the mixture comes together into a soft, moldable dough. If it feels a little dry, add a dab of more frosting. Too wet? Toss in some extra crumbs. You want a perfect moldable texture, no crumbly disasters allowed.
Step 4: Roll, roll, roll your pops
Grab a small spoon to portion out your mixture. Form each one into a silky sphere with your hands, roughly matching the size of a ping-pong ball. Place them on a parchment-lined tray. Here’s the secret sauce: pop that tray into the freezer for at least 30 minutes. This little chill session saves your pops from turning into sad, crumbly blobs later.
Step 5: Stick it like a boss
Melt some orange candy melts (follow the package directions, but keep an eye so you don’t burn them!). Give each stick a light candy coating on the end, then slide it carefully into the cake ball until it’s secure. This sticky move is like glue for your pops, keeping them together during the dipping party.
Step 6: Dip and dazzle
Melt the rest of your candy melts until silky smooth. Now for the fun part, dip each pop into the orange goodness. Want to get fancy? Sprinkle with edible glitter, crushed nuts, or tiny autumn sprinkles while the coating’s still wet. Enjoy!

Mistakes to Avoid When Making Pumpkin Cake Pops
Avoid overmixing the batter
Once everything is combined, mix just until smooth. Overmixing can make the cake dense and tough, and we want light, fluffy pops that melt in your mouth.
Don’t rush the dipping process
If your candy melts get too thick, warm them gently again, don’t add water, it’ll ruin the texture. Coat each cake pop separately, tapping off the extra coating for a neat finish.
Don’t overcrowd the freezer or fridge
Give your cake balls some breathing room when chilling. If they’re squished together, they can stick and lose their perfect round shape.
Using thick candy melts
If your coating is too thick, it’ll look clumpy and might pull the cake off the stick. Thin it out a bit with a touch of coconut oil or vegetable shortening if needed.
How to Store Pumpkin Cake Pops
- In the fridge (best for short-term): Pop them in an airtight container and refrigerate for up to 1 week.
- On the counter (just for the day): If you’re serving them the same day, you can leave them at room temperature for a few hours, just keep them in a cool spot, away from sunlight or heat.
- In the freezer (for later!): Freeze the cake balls, undipped, in a ziplock bag and keep them fresh for up to two months. Thaw in the fridge overnight, then dip fresh.
- Avoid storing near strong smells: Cake pops can absorb odors in the fridge, keep them sealed tight and away from onions, garlic, or anything that smells bold.
- If gifting or serving later: Wrap each pop in a little treat bag with a twist tie, it keeps them fresh and cute for parties or holidays.
Don’t forget to try my Oreo cake pops, you’ll love them.
FAQs
Why are my cake pops not forming?
If your cake pops aren’t holding their shape, it’s likely the mixture is too dry or too soft. Try adding a bit more frosting if it’s crumbly, or if it’s too mushy, chill the mixture longer before rolling. You want a texture that feels like soft cookie dough: easy to roll, but firm enough to hold its shape.
What can I use instead of candy melts for cake pops?
No candy melts? No problem! You can totally use white chocolate chips or almond bark instead. Just melt them gently and add a little neutral oil (like vegetable or coconut oil) to thin it out for easy dipping. Want color? Add a tiny bit of oil-based food coloring. It gives you the same glossy finish, just a little DIY twist!
Can I use straws instead of cake pop sticks?
Yes, you absolutely can! Paper straws are a cute and fun alternative to traditional cake pop sticks, they add personality and color. Just make sure they’re sturdy enough to hold the cake pop without bending, and insert them the same way you would a regular stick (dip first in melted coating, then press into the cake ball).

Soft and Fluffy Pumpkin Cake Pops
Ingredients
- 1 cup pumpkin puree
- 2 large eggs + 1 extra yolk at room temperature
- ½ teaspoon pure vanilla extract
- ½ cup vegetable oil
- 1 cup water
- 1 box yellow cake mix
- 1 teaspoon ground cinnamon
- ½ teaspoon ground ginger
- ½ teaspoon nutmeg
- 1 can whipped cream cheese frosting
- 4 cups orange candy melts
Instructions
- Start by grabbing a large mixing bowl and adding your yellow cake mix, water, vegetable oil, eggs (including that extra yolk), pumpkin puree, and your cozy spices. Don’t forget a splash of vanilla extract! Stir everything together until you have a smooth, thick, and creamy batter that smells like fall in a bowl.
- Pour the batter into a greased or parchment-lined baking pan and bake for about 23 minutes. You’ll know it’s done when the top springs back with a gentle press. While it bakes, feel free to do a little happy dance, you’re on your way! Let the cake cool down completely.
- When the cake has cooled, crumble it finely into a large bowl. Add the whipped cream cheese frosting and mix until it forms a soft, dough-like consistency. If it feels a bit dry, add a little more frosting; if it’s too wet, sprinkle in some extra crumbs. You want a texture that’s easy to shape but holds together well.
- Next, scoop out portions of the mixture using a small spoon and gently roll each into a smooth ball about the size of a ping-pong ball. Arrange the balls on a parchment-lined tray and freeze for at least 30 minutes to firm them up for easier dipping.
- At the same time, heat your orange candy melts following the package guidelines. Dip the tip of each lollipop stick into the melted candy, then gently insert it into each cake ball to secure the stick in place. This little trick keeps your pops intact during dipping.
- Finally, dip each cake pop into the melted candy melts, making sure it’s fully coated. If you want to add some flair, sprinkle on edible glitter, crushed nuts, or festive autumn sprinkles while the coating is still soft. Then, let them set and enjoy your beautiful, delicious pumpkin cake pops!
Notes
- For extra flavor, add a tiny pinch of salt to the batter, it balances the sweetness beautifully.
- Let your candy melts cool just a bit after melting; dipping too hot can cause cracks in the coating.
- When transporting your cake pops, use a box with foam or a cake pop holder to keep them upright and flawless.