You know those moments when you want a dessert that feels like a little celebration but without the fuss or waiting around? That’s exactly why I love this No Bake Oreo Pie, it’s like the ultimate sweet shortcut that somehow tastes way more indulgent than it should.
No oven needed, no complicated steps, just simple ingredients coming together to make magic happen. Whether you’re entertaining friends, surprising your family, or just treating yourself after a long day, this Oreo pie will quickly become your go-to. Grab your Oreos, and let’s make something awesome together, you’re going to love how easy and satisfying this is!
And hey, if this Oreo pie is hitting the spot, you’re going to want to dive into my Oreo ice cream cake and Oreo cupcakes next. They’re like the perfect Oreo remix, same great flavor, just a little twist to keep things interesting.
What’s Awesome About Oreo Pie
Crunch meets creamy. That buttery Oreo crust gives the perfect crunch, while the filling is silky smooth with just the right amount of cookie crunch mixed in.
A crowd-pleaser, no matter the occasion. Whether it’s a family get-together or a last-minute craving, this pie always gets the “wow” reaction.
Sweet simplicity with a twist. Straightforward and delicious, Oreos transformed into magic anyone can pull off.
Surprisingly light, yet utterly indulgent. Thanks to the whipped filling and a pinch of vanilla, it’s a dessert that feels like a treat but doesn’t weigh you down.
Quick to make, quicker to disappear. You’ll be shocked how fast this pie goes from fridge to fork, better make a double batch!
The Good Stuff You’ll Need
- Oreos for the crust: You can’t skip this, it gives you that perfect crunchy base everyone loves.
- Pinch of salt: Maybe just a tiny sprinkle here to brighten up all the sweet flavors.
- Unsalted butter, melted: I recommend using this to hold your crust together with a rich, buttery touch.
- Oreos for the filling: It’s best if these are crushed well so they blend into the creamy filling just right.
- Cool Whip: You can rely on this for a light, fluffy texture that makes the filling dreamy without the effort.
- Pure vanilla extract: A splash of this adds warmth and depth, I always say it’s what turns good into unforgettable.
How to Make No Bake Oreo Pie
Step 1: Crush those cookies like a boss
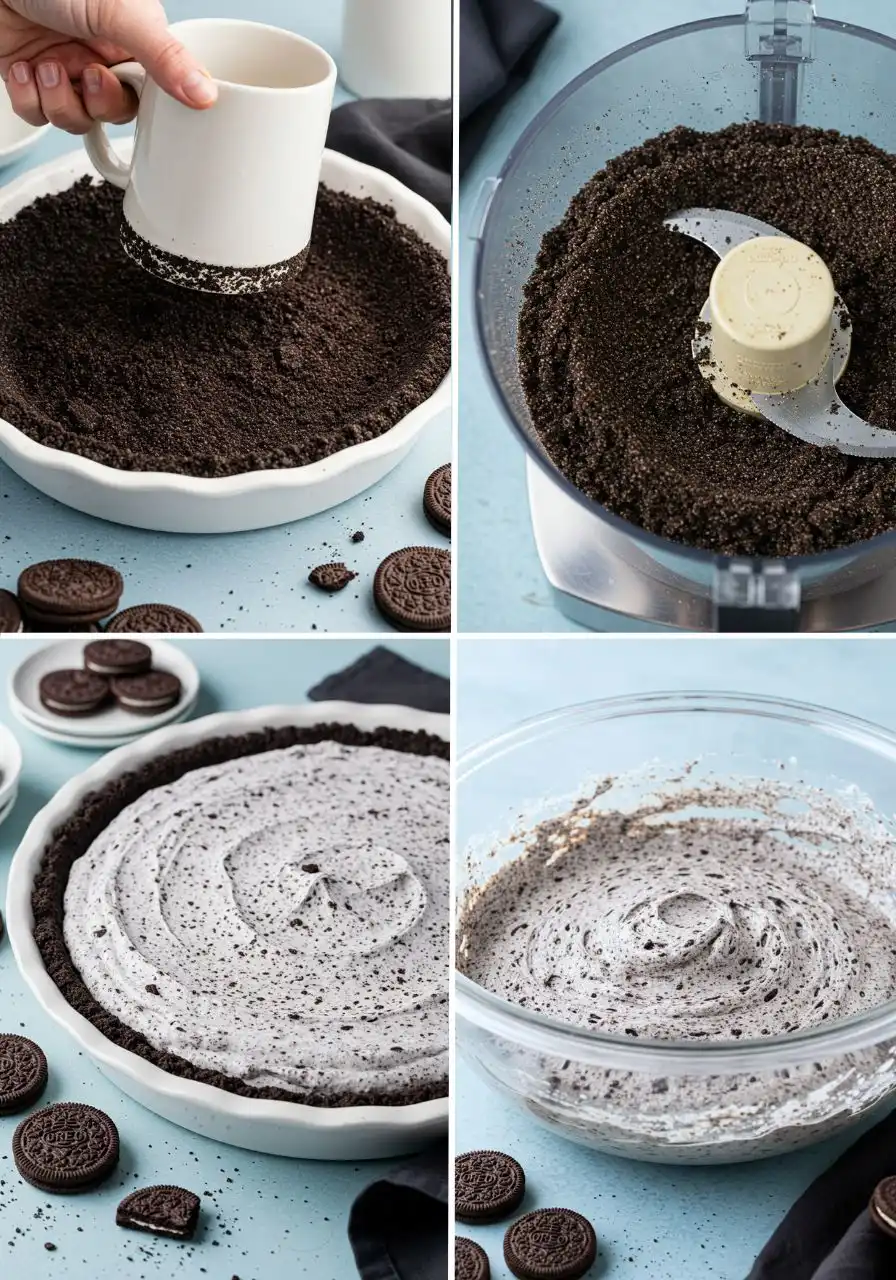
Take your 24 Oreos and blitz them in a food processor until you’ve got fine, even crumbs. No fancy gear? No stress, just toss them in a sturdy bag and go with a rolling pin or the bottom of your favorite mug. The goal? Cookie crumbs that feel like sand between your fingers.
Step 2: Butter up and build your crust
Dump your crumb mix into a bowl and drizzle the melted unsalted butter over it, then sprinkle that pinch of salt. Stir it up until every crumb is coated in buttery goodness, it should look and feel like beachy wet sand.
Now for the fun part: press the crust into your 9-inch pie dish using the flat bottom of a glass or even your fingers if you want to get hands-on. Pack it tight so it’s firm and proud, ready to hold all that creamy filling. Pop it in the fridge for about 15 minutes to chill while you move on.
Step 3: Fill up with cookie magic
Crush 14 Oreos, aiming for a bit more texture here, don’t pulverize everything, you want those delightful cookie chunks to surprise you. In a mixing bowl, fold the crushed Oreos gently into half of the Cool Whip along with that splash of pure vanilla extract.
Step 4: Layer like a pro
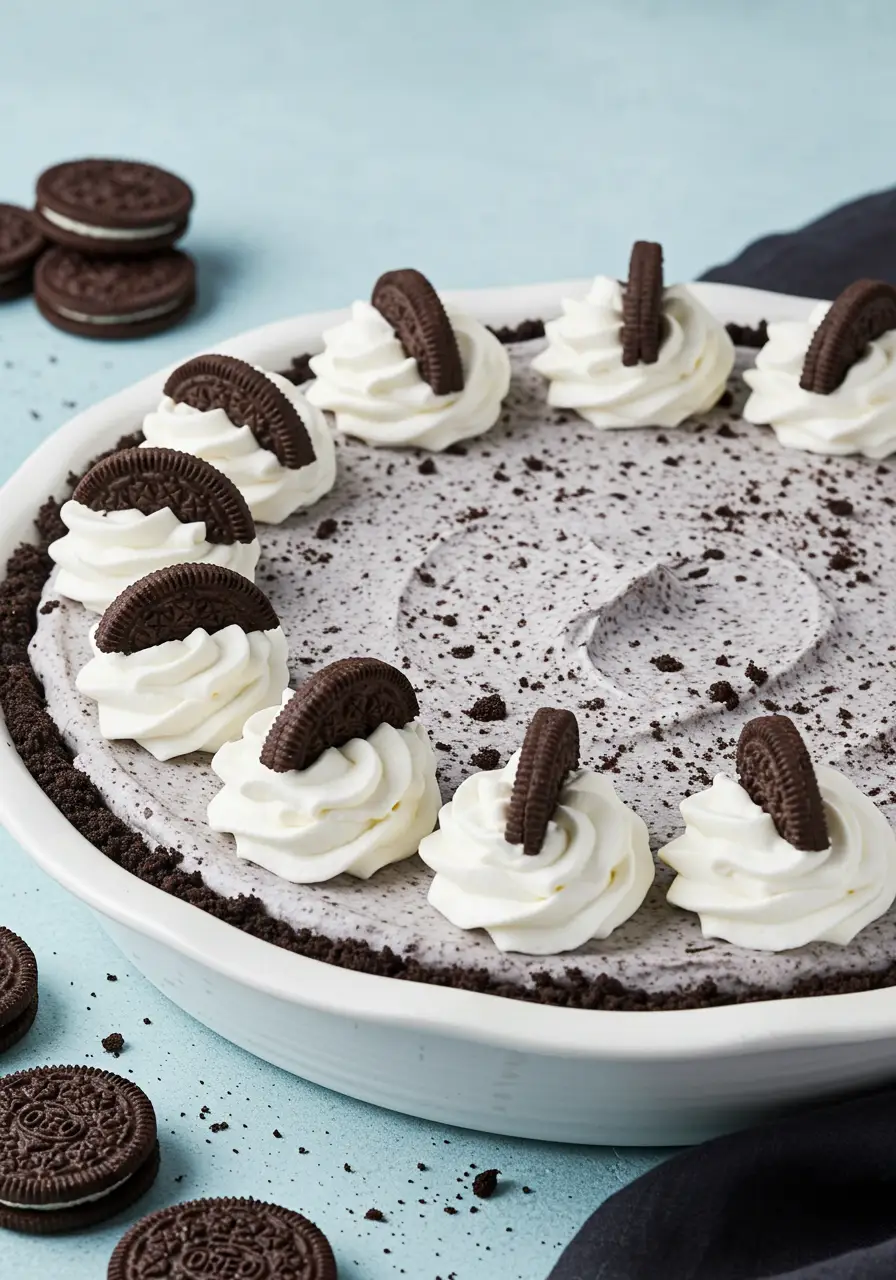
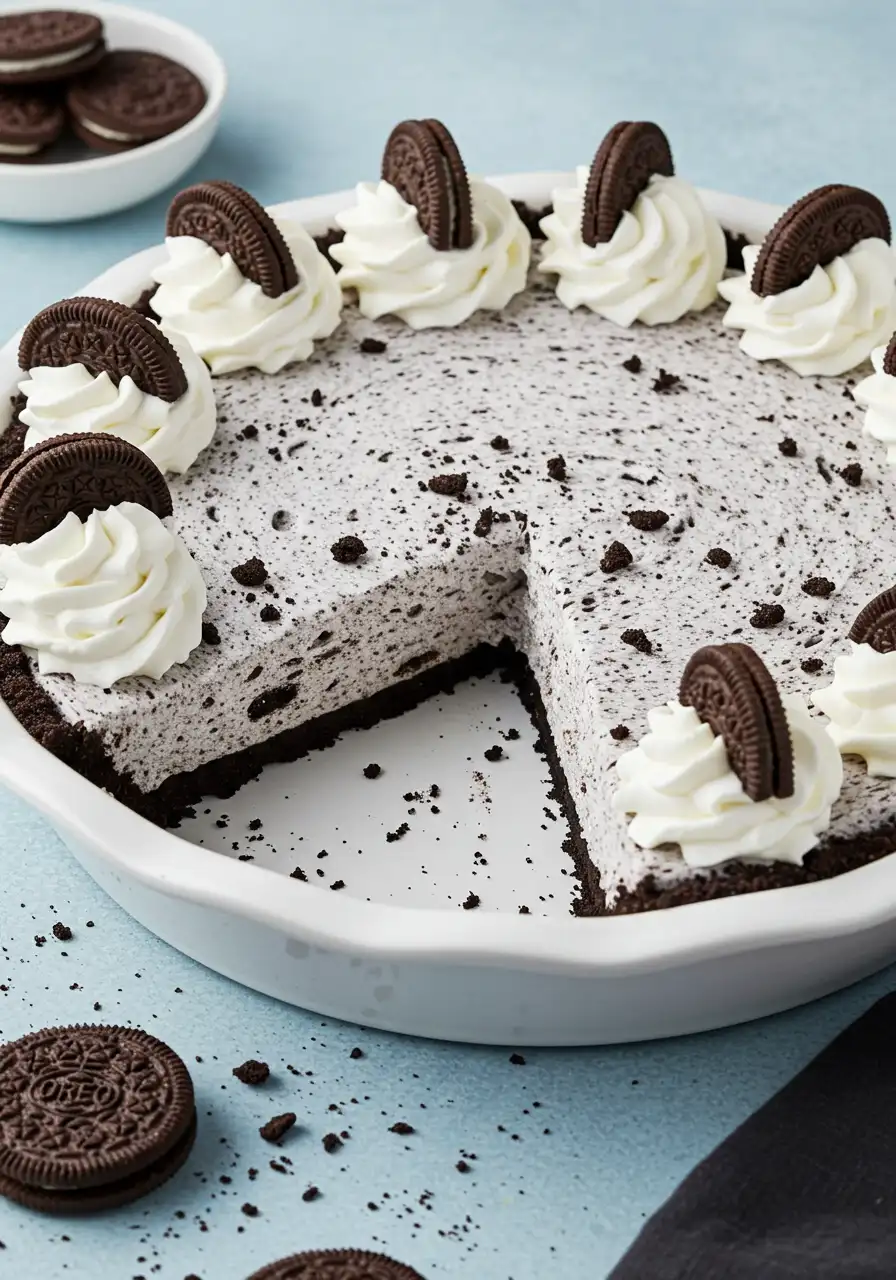
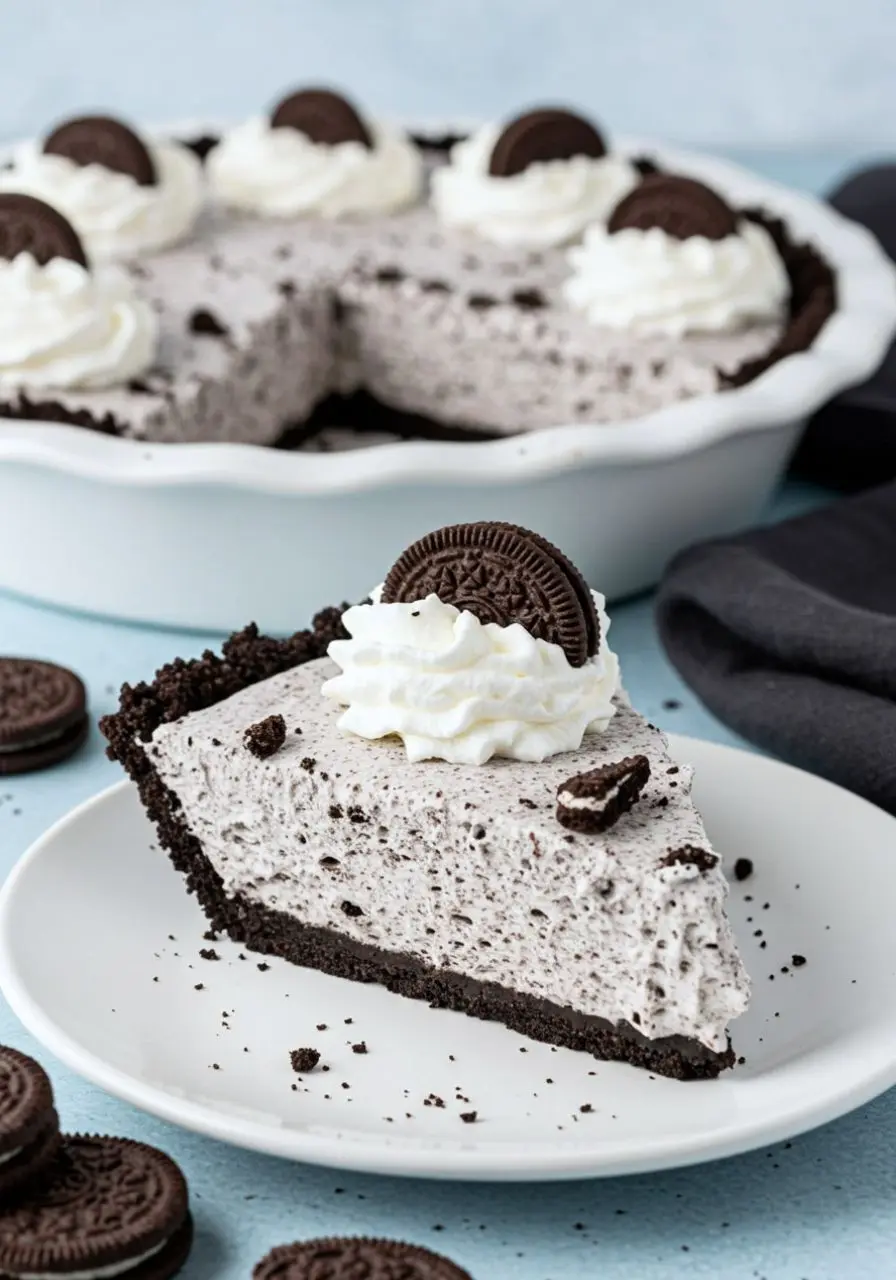
Spoon your filling over the chilled crust and smooth it out with a spatula or the back of a spoon. Don’t stress about perfection. You can cover the top with the other half of the cool whip, or just pip some around the edges, (your call).
Step 5: Let it chill (and bond)
Cover your masterpiece with plastic wrap and let it chill in the fridge for 3 hours. This step lets everything set and the flavors get cozy. Trust me, it’s worth the wait.
Step 6: The grand finale
Right before serving, crush a few Oreos and sprinkle them on top for that extra crunch and visual “wow.” Slice it up, dig in, and prepare for compliments (and maybe some jealous friends).
See, it’s crazy easy, just Oreos and Cool Whip, but don’t let that fool you. This pie packs way more flavor and fun than you’d expect.
Mistakes to Avoid
Using hot melted butter. Butter should be melted and warm, not hot, or it can make the crust greasy and soggy.
Pressing the crust only on the bottom, not the sides. Forgetting the sides means the filling can leak or collapse. Make sure to pack crumbs evenly up the sides for sturdy support.
Using the wrong size pie dish. Too big, and your pie will be shallow and flat; too small, and it might overflow. Stick to a 9-inch dish for perfect proportions.
Not covering the pie while chilling. Cover to avoid fridge odors and keep your pie fresh.
Using a dull knife for slicing. A sharp, clean knife makes neat slices and a prettier presentation.
Fun Oreo Pie Ideas
- Add a drizzle of caramel or chocolate sauce, because who says you can’t make this pie even more indulgent?
- Mix in mini chocolate chips with the filling for surprise pockets of goodness.
- Swap out Cool Whip for whipped cream and a bit of cream cheese for a tangy twist that’s still silky smooth.
- Top with crushed nuts like pecans or almonds for an unexpected crunch.
- Turn it into a s’mores party, layer mini marshmallows on top and give them a quick broil or torch for that toasty, gooey finish.
- Add a zing of citrus, fold in some finely grated orange or lemon zest to the filling for a fresh, bright twist.
- Cookie Butter Explosion, swirl in some cookie butter or peanut butter into the filling for extra creamy decadence.
Since you’re already crushing on this no-bake Oreo magic, why not take it up a notch with my no bake Oreo cake pops. Same delicious Oreo goodness, just in fun, bite-sized form, perfect for sharing or sneaking a few for yourself!
How to Store Oreo Pie
Refrigerate, always. Because it’s a no-bake cream pie, the magic of Oreo Pie lies in keeping it chilled for flawless texture and flavor.
Freeze for longer storage. Want to keep it beyond a couple of days? Freeze it covered for up to a month, but thaw in the fridge overnight to keep that creamy magic intact.
Skip the countertop wait. Your crust might get soggy, and your filling can lose that perfect fluff. Keep it cool until serving for max yum.
I’d love to hear how your Oreo pie turned out! Drop a comment below to share your thoughts, any twists you tried, or just to say hi. Your feedback always makes my day.
FAQs
Can I add extra flavors to the filling?
Yes! Add a bit of coffee, a hint of mint, or a pinch of cinnamon to give your Oreo pie an irresistible upgrade. Just add small amounts and taste as you go, so you don’t overpower that classic Oreo goodness.
How do I keep my pie from weeping (getting watery)?
Make sure your Cool Whip is fresh and well-chilled before mixing. Over-mixing or letting the pie sit out too long can cause some moisture to separate, chilling helps keep everything tight and creamy.
What if I don’t have a pie dish?
No worries! You can use a round cake pan or even a deep-dish tart pan. Just keep in mind the size and depth might change how much filling you need.

Quick & Simple Oreo Pie Recipe
Ingredients
- 24 whole Oreos finely crushed for the crust
- Pinch of salt
- ¼ cup unsalted butter melted
- 14 Oreos crushed for the filling
- 1 16-ounce container of Cool Whip
- ½ teaspoon of pure vanilla extract
Instructions
- First up, take your 24 Oreos and crush them into fine crumbs. Without a food processor, simply bag the cookies and smash them with a rolling pin or hefty mug until they reach a soft, sandy texture.
- Next, dump those crumbs into a bowl, pour over the melted unsalted butter, and sprinkle in a pinch of salt. Stir it all together until every crumb is coated and the texture reminds you of damp sand at the beach.
- Pack the crumbs snugly into a 9-inch pie pan, flattening them evenly with your hands or the base of a glass. Make sure it’s packed tight so it can hold the filling without falling apart. Toss it into the fridge for about 15 minutes to chill while you prepare the filling.
- For the filling, crush 14 Oreos but keep some chunks for that fun texture. Gently fold these chunks into half of your Cool Whip along with a splash of pure vanilla extract.
- Spoon this creamy filling over your chilled crust and spread it out with a spatula or spoon. Spread the rest of the Cool Whip on top or just dollop it around the edges, either way works.
- Seal the pie with plastic wrap and chill it in the refrigerator for around 3 hours. This is where the magic happens, everything sets and the flavors blend beautifully. It’s worth the wait, I promise.
- Right before serving, crush a few Oreos and sprinkle them over the top for a little crunch and a nice finishing touch. Slice it up, serve, and enjoy!
Notes
- You can add a little cocoa powder to the crust crumbs for a deeper chocolate kick.
- Before pressing the crust, spray your pie dish lightly with non-stick spray to help release the pie easier.