Can we just agree that the best part of holiday baking isn’t perfection, it’s the sprinkles everywhere, the frosting on your sleeve, and that one cookie shaped more like a cactus than a tree? That’s why you’ll love making Christmas tree cookies. They’re the kind of holiday treats that don’t just taste good, they make memories.
Whether you’re rolling out dough with little helpers, or sneaking into the kitchen at midnight to decorate a few on your own, these Christmas cookies always deliver a bit of festive magic. So grab your butter, your food coloring, and maybe a favorite playlist, because we’re about to turn a simple cookie into the highlight of your holiday.
Why Christmas Tree Cookies Are a Must This Holiday
Encourages Creativity – Each cookie is a mini project. Try different patterns, designs, or even make a “forest” on your tray.
Holiday Baking Confidence – Simple ingredients and easy steps mean even first-time bakers will feel like pros.
Perfectly Soft, Yet Hold Their Shape – They’re soft to bite, but firm enough to stack, decorate, and gift without crumbling. A true baker’s dream.
Last-Minute Gift Hero – These cookies are as beautiful as they are delicious, making them a go-to for quick, thoughtful holiday gifts.
Easy to Store, Easy to Share – Bake a batch ahead of time, store in an airtight container, and pull them out whenever you need a little festive cheer.

The Ingredients You’ll Need
- All-Purpose Flour: I always recommend using plain flour for cookies because it gives them structure while keeping them tender.
- Baking Powder: This is your puff-helper; I like to add it for that gentle rise that keeps cookies soft but not flat.
- Baking Soda: I suggest using a pinch because it works with sugar to give that perfect soft-and-chewy texture.
- Cornstarch: It’s the secret to cookies that melt in your mouth and feel extra delicate.
- Salted Butter: This is what makes your cookies taste rich and buttery, like a holiday treat.
- Granulated Sugar: I recommend this to sweeten without overpowering; it also helps create lightly crisp edges.
- Egg: I always use eggs as a binder, they hold everything together and add a little richness to the dough.
- Vanilla Extract: I suggest adding a good splash; it gives that warm, classic flavor that makes these cookies feel festive.
- Powdered Sugar: For frosting, I always recommend sifting it, smooth frosting makes decorating so much easier.
- Milk: I like adding milk slowly; it helps your frosting reach the perfect creamy consistency for piping and spreading.
- Green Food Coloring: Just a few drops at first; it turns your frosting into festive Christmas trees without overpowering the flavor.
If you want a chocolatey holiday treat that’s just as festive, check out my Christmas Tree Brownies, rich, and fudgy.
How to Make Christmas Tree Cookies
Step 1: Set Up Your Holiday Baking Zone
Before you touch a single ingredient, grab a little counter space, lay down parchment paper, and preheat your oven to 325°F (160°C). I like to have everything within reach, it makes the whole process smoother and more fun.
Step 2: Cream the Butter and Sugar Like a Pro
Pop your salted butter and granulated sugar into a large bowl. Beat them together until fluffy and pale. Scrape the sides of the bowl at least once, it ensures every bit of butter gets incorporated and you get that perfectly soft texture.
Step 3: Add Egg and Vanilla, Don’t Rush the Magic
Lower your mixer speed, add the egg and vanilla extract, and mix until everything is fully combined. Pro tip: if your egg is cold, the dough might seize a bit, just let it sit for 5 minutes or gently warm it in your hands before adding.
Step 4: Combine the Dry Ingredients Carefully
In a separate bowl, whisk all-purpose flour, cornstarch, baking powder, and baking soda. Slowly add to the wet mixture on low speed. I like to add a little at a time so the dough stays soft, not stiff. If it feels crumbly, don’t worry! Gently knead it with your hands, and it will come together beautifully.
Step 5: Roll It Out and Keep It Soft
Lightly flour your surface and roll the dough to about ¼ inch thick. I love leaving it slightly soft, it makes the cookies tender, and they bake up perfectly. Tip: roll from the center outwards and rotate the dough a quarter turn every few rolls to avoid sticking.
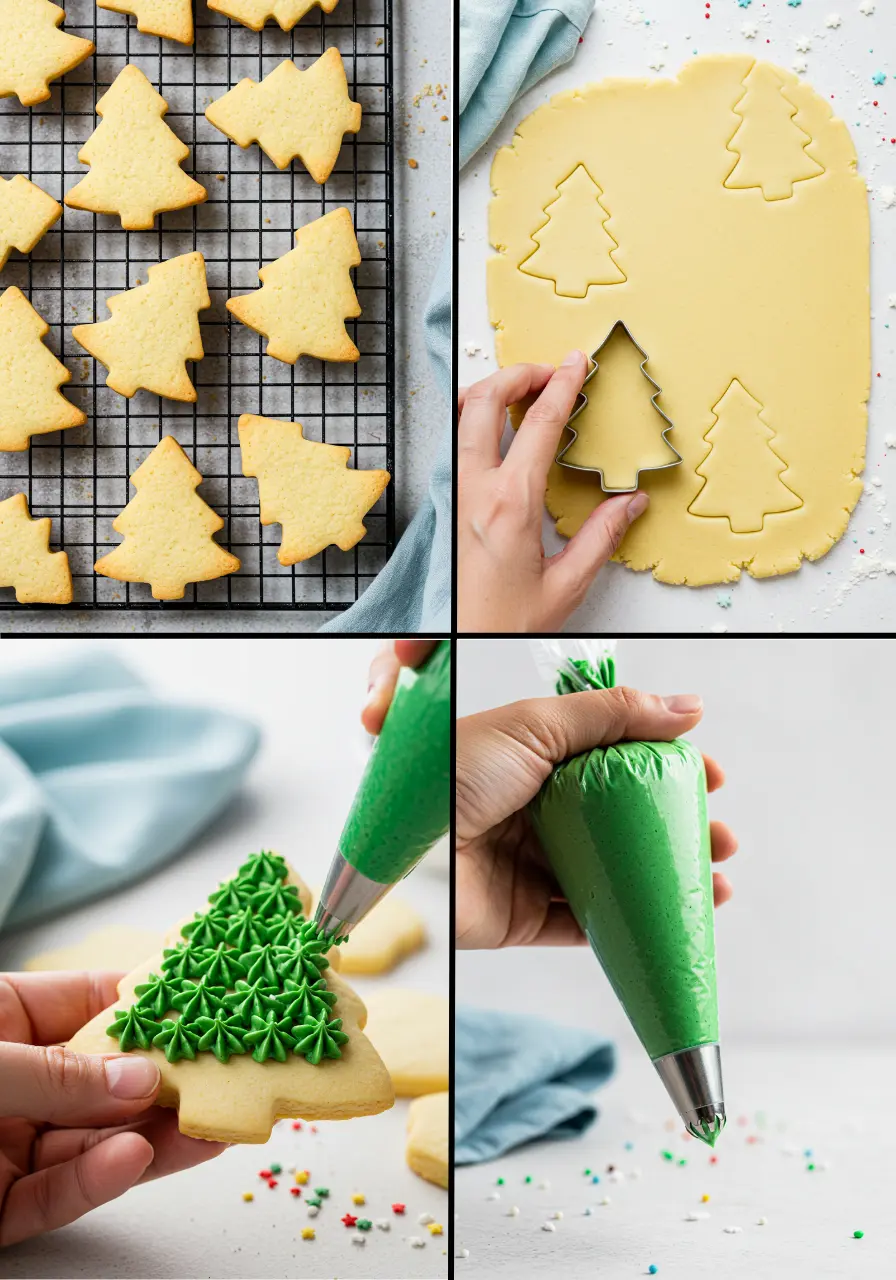
Step 6: Cut Your Christmas Trees
Use your favorite cookie cutter to make festive shapes. I recommend pressing straight down without twisting, that keeps edges clean. For sticky dough, lightly flour the cutter instead of adding too much flour to the dough.
Step 7: Transfer to Baking Sheet
Carefully lift each cookie with a thin spatula. Slide it under gently and support the shape with my fingers, this prevents bending or breaking.
Step 8: Bake to Soft Perfection
Bake at 325°F (160°C) for 12–13 minutes. Look for lightly set edges and soft centers. A little tip: if your cookies are small, check a minute or two earlier, they bake fast! Let them rest on the sheet for a few minutes before moving to a cooling rack; this avoids accidental cracks.
Step 9: Whip Up the Frosting
While the cookies cool, beat together powdered sugar, salted butter, milk, and vanilla extract until smooth. Gradually add green food coloring until you hit that perfect festive shade.
Step 10: Decorate Like a Holiday Artist
Spoon frosting into a piping bag with a star tip. Pipe little stars, swirls, or dots to make each cookie shine. Tiny tip: frosting looks even prettier if you pipe in small bursts rather than one continuous line. Sprinkles or edible stars are optional, but they add that extra sparkle!
Step back and admire your tray of festive trees. Then, of course, taste-test, because that’s half the fun.
Common Mistakes to Skip
Overworking the Dough – I always tell friends: mix gently! Over-kneading can make the cookies tough instead of soft and tender. Take your time and let the ingredients do their thing.
Skipping the Cooling Step – Moving cookies too soon from the baking sheet can make them break. Patience pays off, let them rest for a few minutes before transferring to a cooling rack.
Not Measuring Ingredients Correctly – Baking is a science! I always recommend spooning flour into the cup and leveling it, instead of scooping straight from the bag. Tiny differences make a big impact.
Overbaking – Cookies continue to cook a little after coming out of the oven. Pull them out when edges are set but centers are soft.

Flavor Twists to Try
Looking to add a festive twist to your Christmas tree cookies? These simple flavor ideas will do the trick!
- Cinnamon or Nutmeg Kick – I recommend adding a tiny pinch to the dough for a warm, cozy holiday flavor. Perfect for a little festive twist without overpowering the cookie.
- Almond or Hazelnut Extract – Swap a small portion of vanilla with almond or hazelnut extract. Just a drop or two adds a subtle nutty aroma that makes each bite feel extra special.
- Citrus Zest – A tiny sprinkle of orange or lemon zest in the dough gives a fresh, bright note. I love it for a slightly unexpected, festive flavor.
- Flavored Frosting – Try a hint of peppermint or maple in your frosting. A few drops of extract can turn your green frosting into something uniquely festive.
- Sprinkle Swaps – Switch up your sprinkles to match a theme: gold stars, edible glitter, or tiny candy beads. Decorating is part of the fun!
How to Store Christmas Tree Cookies
Room Temperature: Store in an airtight container for up to 5 days. Tip: Place a slice of bread in the container, it keeps cookies soft and fresh longer.
Separate Layers: When arranging cookies in layers, separate them with parchment paper for neat storage. This prevents frosting from sticking and keeps decorations perfect.
Freezing: You can freeze undecorated cookies for up to 3 months. Freeze flat on a baking sheet first, then transfer to a freezer bag. Frost after thawing for best results.
Avoid Moisture: Always keep cookies in a dry spot, humidity makes them soft and can ruin the frosting texture.
Have fun baking these Christmas tree cookies and making them your own! I’d love to hear how yours turn out, leave a comment below and share your festive creations!
More Recipes for Your Holiday Table

Soft & Easy Christmas Tree Cookies
Ingredients
For the Cookies
- 4 cups all-purpose flour
- 1 ½ teaspoons baking powder
- ½ teaspoon baking soda
- ½ cup cornstarch
- 1 ½ cups salted butter softened
- 1 ⅓ cups granulated sugar
- 1 large egg
- 2 –3 teaspoons vanilla extract
For the Frosting
- 6 cups powdered sugar sifted
- 1 cup salted butter softened
- 5 –6 tablespoons milk
- 2 teaspoons vanilla extract
- Green food coloring
- Sprinkles for decoration
Instructions
- Start by clearing a bit of counter space and laying down some parchment paper. Preheat your oven to 325°F (160°C) so it’s ready when your dough is set.
- In a large bowl, toss in your salted butter and granulated sugar, then beat them together until the mixture is light, fluffy, and creamy. Make sure to scrape the sides a couple of times so nothing gets left behind, this little step makes the dough soft and perfect for rolling.
- Lower your mixer speed, add the egg and vanilla extract, and blend until everything comes together smoothly.
- In a separate bowl, whisk the all-purpose flour, cornstarch, baking powder, and baking soda. Slowly add this dry mix to your wet ingredients, a little at a time, keeping the mixer low so the dough stays tender. If it looks crumbly, don’t stress, just knead gently with your hands until it forms a soft, workable ball.
- Lightly flour your work surface and roll out the dough to roughly ¼ inch thick. A slightly soft dough makes for tender cookies, so don’t over-flour or over-roll. You can roll from the center out and give the dough a quarter turn every so often to prevent sticking.
- Use your cookie cutter to press out festive shapes, pressing straight down without twisting to keep the edges neat. If the dough clings to the cutter, dust it lightly with flour rather than adding more to the dough.
- Transfer each cookie carefully to a baking sheet using a thin spatula, supporting the edges with your fingers so they keep their shape.
- Bake the cookies for about 12–13 minutes. The edges should be set while the centers remain soft. Smaller cookies may need just a touch less time, so peek at them closely. Let them sit on the sheet for a few minutes before moving to a cooling rack, this helps avoid cracking and keeps them looking perfect.
- While the cookies cool, whip up the frosting by combining powdered sugar, salted butter, milk, and vanilla extract until smooth and creamy. Gradually mix in green food coloring until you get that festive shade you love.
- Spoon the frosting into a piping bag with a star tip and start decorating! Pipe tiny stars, swirls, or dots, piping in short bursts usually gives the nicest results. Sprinkle on edible stars or glitter if you like; it really makes the trees shine. Enjoy!
Notes
- Start with a tiny drop of food coloring and build, it’s easier than trying to fix overly dark frosting.
- Leftover dough scraps? Gently press them together and roll again, nothing goes to waste!
- If your frosting gets too thick, a tiny splash of milk at a time will bring it back to perfect piping consistency.