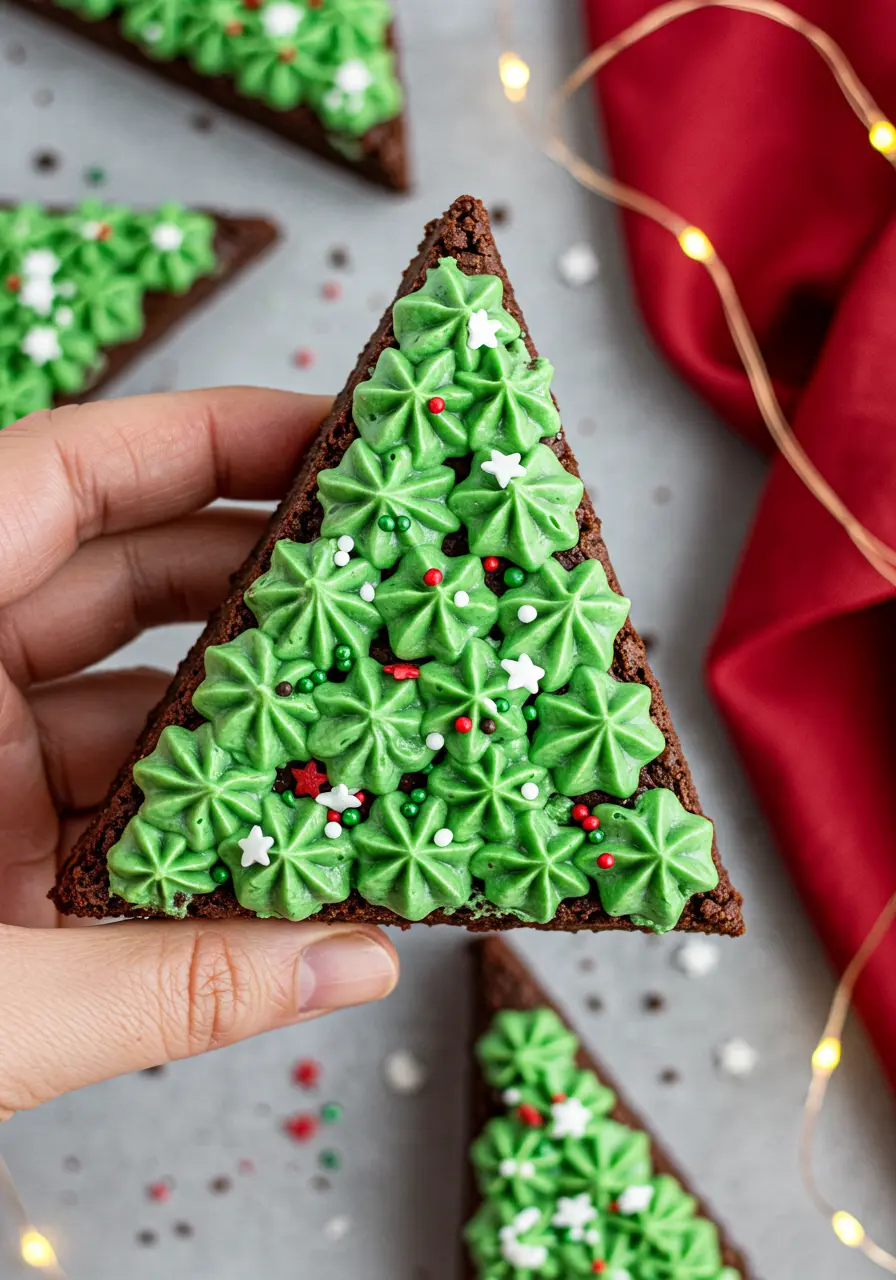
Tell me, what’s the one dessert that never fails to bring people together? For me, it’s brownies. Now, take that cozy classic and give it a holiday glow-up, and you’ve got these Christmas Tree Brownies.
They’re fudgy, chocolatey, and dressed up in green frosting and sprinkles like the most delicious little trees you’ve ever seen.
What you’ll love most is that they’re more than just a dessert. They’re a moment. You can bake them with your kids, decorate them with friends, or whip them up as easy Christmas snacks when you want something festive without the fuss. It’s the kind of recipe that doesn’t just sit pretty on a plate, it makes memories.
If you love the idea of festive chocolate treats, my peppermint brownies are another holiday favorite, bursting with chocolate goodness and just as fun to share.
Why These Christmas Tree Brownies Are a Must-Try
Perfect for sharing – they make cozy Christmas snacks that will impress family, friends, or anyone lucky enough to grab one.
Fun for all skill levels – whether you’re a baking pro or just starting out, these brownies are foolproof and seriously satisfying.
Multi-purpose – great as a dessert, party centerpiece, or cozy treat with hot cocoa by the fire.
Fun for all skill levels – whether you’re a baking pro or just starting out, these brownies are foolproof and seriously satisfying.
The Ingredients You’ll Need
- All-purpose flour: I recommend spooning and leveling it for brownies that stay tender without being too dense.
- Dutch-process cocoa: Always choose good-quality cocoa for that rich, deep chocolate flavor.
- Espresso (optional): It enhances the chocolate without tasting like coffee.
- Salted butter, melted: I recommend melting gently to add creaminess and help create a fudgy texture.
- Vegetable oil: Always use a neutral oil to keep the brownies moist and soft.
- Eggs + yolk: It’s best if they’re at room temperature to mix smoothly and give a rich, even texture.
- Brown sugar, packed: I recommend packing lightly, it gives warm, caramel-like sweetness and chewiness.
- Granulated sugar: Always use it to balance flavors and create that shiny brownie top.
- Vanilla extract: For a subtle, cozy flavor.
- Chocolate chips: You know this ingredient plays a huge role here, so choose good quality.
- Powdered sugar: I recommend sifting first for silky, lump-free frosting.
- Milk: Add slowly to reach the perfect frosting consistency.
- Green food coloring: Start with a few drops and adjust, you can always make it darker.
- Holiday sprinkles: Always sprinkle generously for a playful, festive vibe.
How to Make Christmas Tree Brownies
Step 1: Prep Your Pan
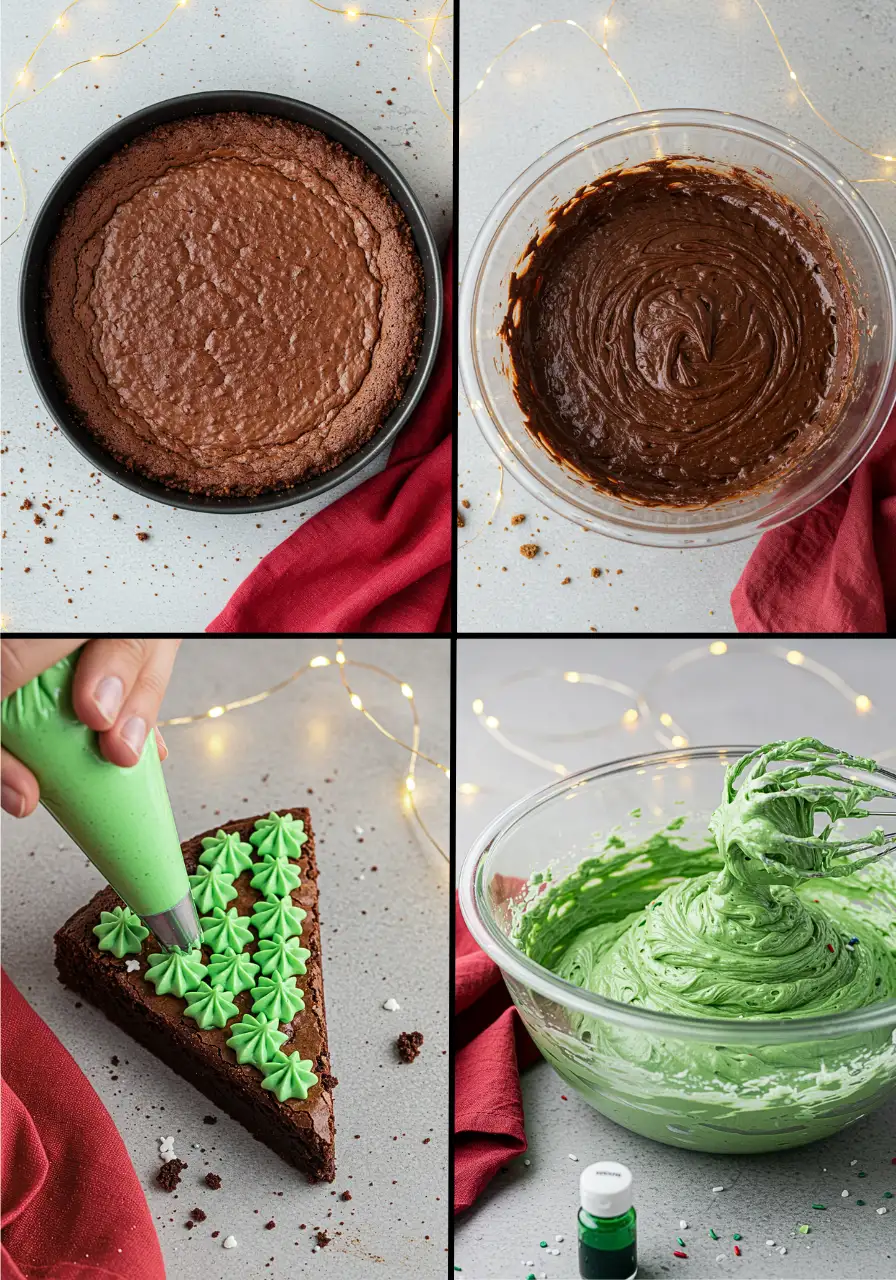
I like to line a 9-inch springform baking pan with parchment paper and give it a gentle butter swipe.
Step 2: Whisk the Sugars and Eggs
Grab a big bowl and toss in the eggs, yolk, brown sugar, granulated sugar and vanilla. I recommend whisking just until smooth, you don’t want to overdo it, but you do want that slightly fluffy texture that gives your brownies a soft, tender crumb.
Step 3: Melt Chocolate and Butter
In a microwave-safe bowl, melt your chocolate chips and butter together in short 30-second bursts, stirring each time. Tip: Stir gently in circles rather than back-and-forth, it helps make it super glossy. Once smooth, whisk in the vegetable oil. This little step ensures extra fudginess and keeps the edges soft.
Step 4: Combine Everything
Pour your chocolate mixture into the sugar-egg mix. I recommend folding gently with a spatula, slow and careful wins the day here. You want every bite rich and chocolatey, not dense or tough.
Step 5: Add Dry Ingredients with a Twist
Sift in the flour, cocoa, and your optional espresso. Fold slowly until just combined. Tiny tip: don’t overmix, a few streaks of flour are fine. They bake out and keep the brownies soft, fudgy, and irresistible.
Step 6: Bake Like a Pro
Pour the batter into your prepared pan and smooth the top. Bake at 350°F (175°C) for about 35 minutes. Here’s my hack: check a few minutes early. That’s the sweet spot for fudgy, biteable brownies. Let them cool in the pan for 30 minutes, patience here pays off!
Step 7: Whip Up the Vibrant Frosting
While the brownies are chilling, beat your softened butter until fluffy. Add vanilla, then gradually fold in the powdered sugar. Slowly add milk, one tablespoon at a time, until it reaches that perfect consistency.
Mix in a few drops of green food coloring until your frosting looks like the happiest little Christmas tree green you’ve ever seen. Pro tip: using a toothpick to test color lets you control the shade without going overboard.
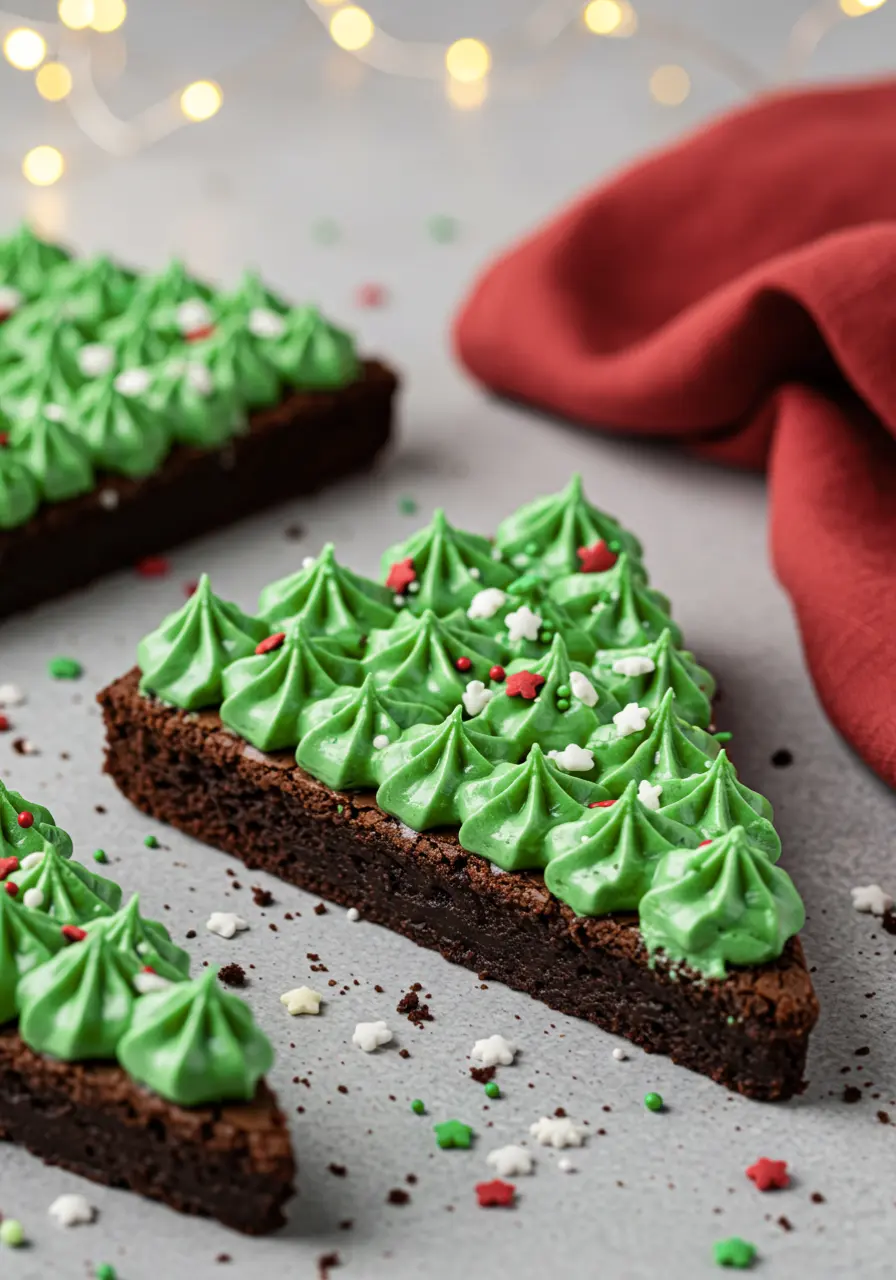
Step 8: Shape Your Trees
Once the brownies are fully cooled, cut them into triangle shapes. Pipe the green frosting using a star tip, then sprinkle, or even extra chocolate chips. Enjoy!
Avoid These 5 Common Mistakes
Overmixing the batter: It’s tempting to stir everything like crazy, but too much mixing can make brownies dense. Tip: fold gently until the flour disappears, a few streaks are totally fine.
Skipping the cooling time: Cutting into warm brownies? Big mistake. Let them cool completely before slicing, or your triangles will crumble. Quick hack: use a plastic knife or warm your knife under hot water for cleaner cuts.
Using cold eggs or butter: Your batter mixes best when eggs are room temperature and butter is soft/melted as needed. It helps everything come together smoothly and keeps the texture perfect.
Overbaking: Brownies continue cooking even after you take them out. Take them out when a toothpick has just a few moist crumbs, slightly underdone gives that perfect fudgy center.
What to Serve With Christmas Tree Brownies
- Hot cocoa with a twist – add a dash of cinnamon or peppermint for extra holiday cheer.
- Vanilla bean ice cream – the creamy sweetness balances the rich chocolate perfectly.
- Warm mulled cider – a cozy drink to sip while admiring your little brownie forest.
- Fresh berries – strawberries or raspberries add a pop of color and a tart contrast.
- Mini marshmallows – scatter some on the side for a playful, snowy touch.
- Peppermint bark – chocolate and mint lovers rejoice; it’s a festive duo!
For a little extra holiday magic, don’t miss my gingerbread cookies, they’re spicy, sweet, and begging to be decorated with tiny edible personalities.
How to Store Your Christmas Tree Brownies
Room temperature is your friend – keep them in an airtight container for 2–3 days. Tip: separate layers with parchment paper so your frosting and sprinkles stay picture-perfect.
Chill for a little longer life – pop them in the fridge for up to a week. Pro tip: let them sit at room temp for 15–20 minutes before serving so they’re soft and fudgy again.
Freeze for future celebrations – wrap individual brownies tightly in plastic wrap, then store in a freezer-safe bag for up to 2 months. Thaw in the fridge overnight, and your brownies are ready for frosting or decorating again.
Protect your decorations – when storing pre-decorated brownies, place a layer of parchment or wax paper on top to keep sprinkles and frosting safe.
More Festive Treats To Bake

Christmas Tree Brownies for the Holidays
Ingredients
The Fudgy Base
- 1 ¼ cups all-purpose flour spooned & leveled
- ¼ cup Dutch-process cocoa
- Pinch of espresso optional
- ½ cup salted butter melted
- 1/2 cup vegetable oil
- 2 large eggs + 1 yolk
- 1 cup brown sugar packed
- 1 cup granulated sugar
- 1½ teaspoons vanilla extract
- 1 ⅓ cups chocolate chips any type
The Vibrant Frosting
- 6 cups powdered sugar sifted
- 2 cups salted butter softened
- 1 teaspoon vanilla extract
- 2-3 tablespoons milk
- Green food coloring
- Holiday sprinkles
Instructions
- Line a 9-inch springform pan with parchment paper or lightly brush with butter so your brownies slide out easily later. In a large bowl, whisk together the eggs, extra yolk, brown sugar, granulated sugar, and vanilla until smooth and slightly fluffy, this gives your brownies a soft, tender bite.
- In a microwave-safe bowl, melt the chocolate chips and butter in short 30-second bursts, stirring gently each time until shiny and smooth.
- Pour the chocolate mixture into the sugar-egg mixture and fold gently with a spatula until just combined. You want every bite rich and chocolatey without becoming heavy.
- Sift in the flour, cocoa, and optional espresso, and fold until almost combined, a few streaks of flour are perfectly fine and will bake out.
- Pour the batter into your prepared pan and smooth the top. Bake at 350°F (175°C) for about 35 minutes. Keep an eye on them near the end, the center should still have a hint of goo for that perfect fudgy texture. Let the brownies cool in the pan for around 30 minutes before removing.
- While the brownies cool, beat the softened butter until light and fluffy. Add vanilla, then gradually mix in powdered sugar. Stir in milk one tablespoon at a time until the frosting reaches a smooth consistency. Add a few drops of green food coloring.
- Once cooled, cut the brownies into triangle shapes. Pipe the frosting using a star tip and sprinkle on your decorations or extra chocolate chips. Your little chocolate trees are now ready to enjoy, festive, fun, and totally irresistible!
Notes
- Using a warm knife to cut the brownies helps keep the edges clean and sharp.
- If you like a little extra texture, fold in some chopped nuts or mini chocolate chunks.