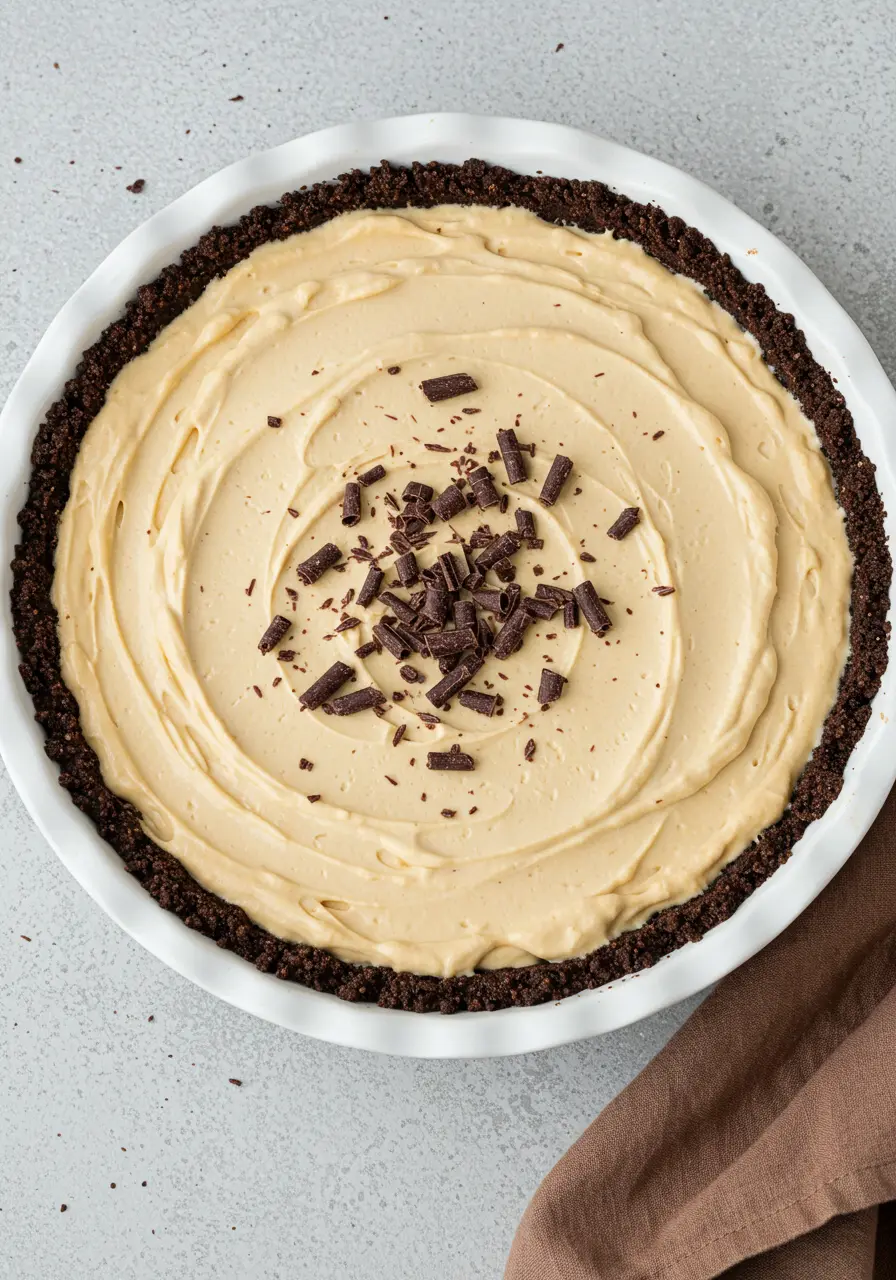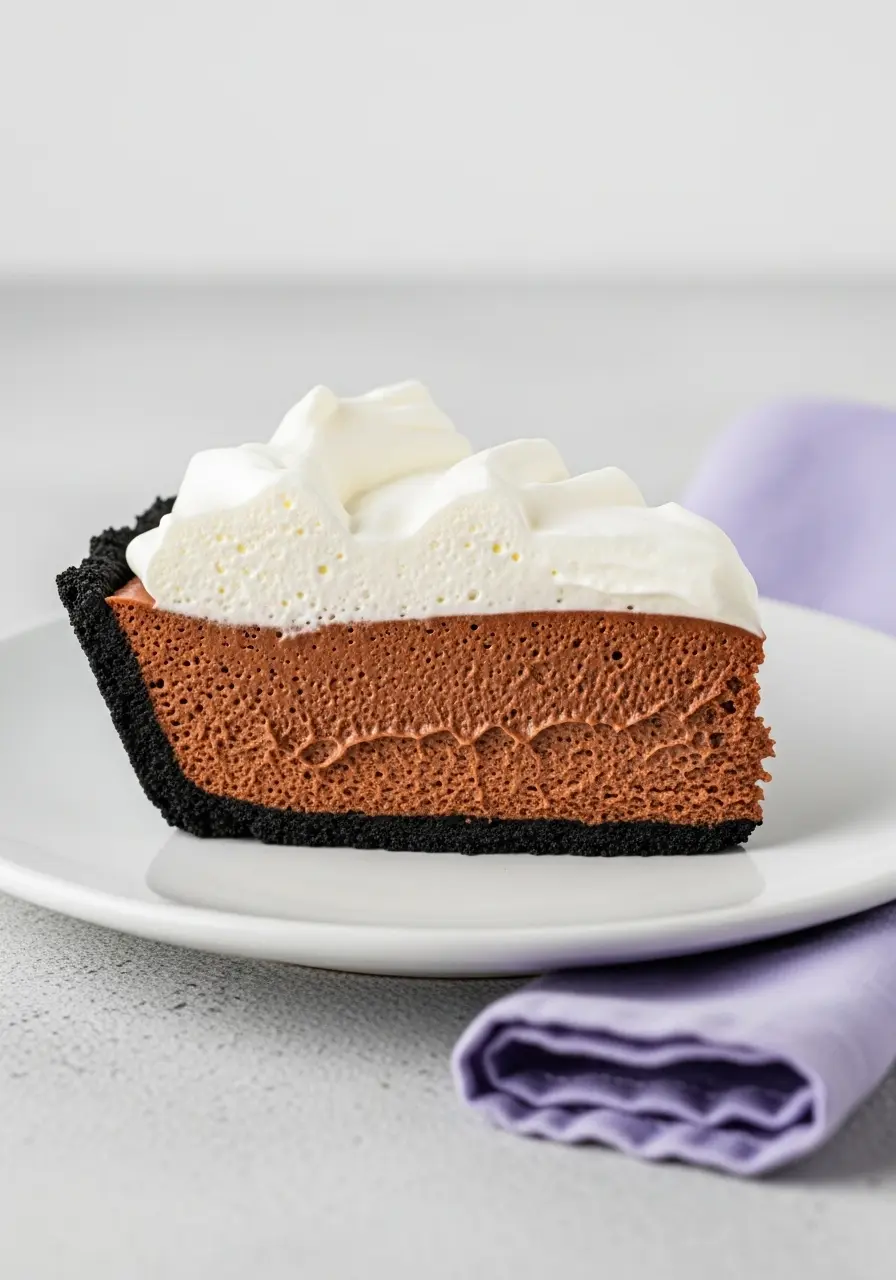
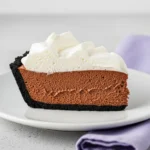
Okay, listen, if dessert had a VIP section, this Chocolate Mousse Pie would be front and center. It’s that magical combo of crunchy Oreo crust, melt-in-your-mouth chocolate mousse, and pillowy whipped cream that somehow makes life feel just a little sweeter. I promise, making it isn’t some complicated baking ritual, it’s the kind of pie that feels fancy but is totally doable.
By the time you take your first forkful, you’re going to wonder why this isn’t your new go-to dessert. And the best part? We’re going to make it together, step by step, no stress, all smiles.
Why Chocolate Mousse Pie Is a Must-Try
Looks fancy, feels easy – seriously, no complicated techniques here. You’ll impress everyone without breaking a sweat.
Kid-approved, adult-approved – whether it’s little hands or grown-up cravings, this pie speaks everyone’s language.
Bakes like a charm – almost impossible to mess up, even if you’re “not a baker.”
The Ingredients You’ll Need
- Oreo Cookies: The base of our pie that gives a chocolate crunch, using the cream adds extra flavor and keeps it perfectly sweet.
- Salted Butter: Melts into the cookie crumbs to hold the crust together and adds a subtle richness that balances the chocolate.
- Egg Yolks: These make the mousse silky and creamy, they’re what turn chocolate and cream into that dreamy, melt-in-your-mouth texture.
- Granulated Sugar: Sweetens the mousse just enough without overpowering the chocolate, helping the flavors stay balanced.
- Whole Milk: Adds lightness and creaminess to the chocolate filling, making it smooth and soft.
- Heavy Cream: Whipped into the mousse or topping, it creates airy, fluffy layers that feel indulgent but light.
- Dark Chocolate: The star ingredient that gives the mousse its deep, rich chocolate flavor, choose a good quality one for the best results.
- Vanilla Extract: Enhances the chocolate and adds warmth, giving the pie a rounded, comforting flavor.
- Pinch of Espresso (optional): A tiny touch that boosts the chocolate taste without making it taste like coffee, it’s a flavor trick pros use.
- Powdered Sugar: Sweetens the whipped cream topping and helps it hold its texture, keeping it light and silky.
How to Make Chocolate Mousse Pie
1. Make the Oreo Crust Your Own
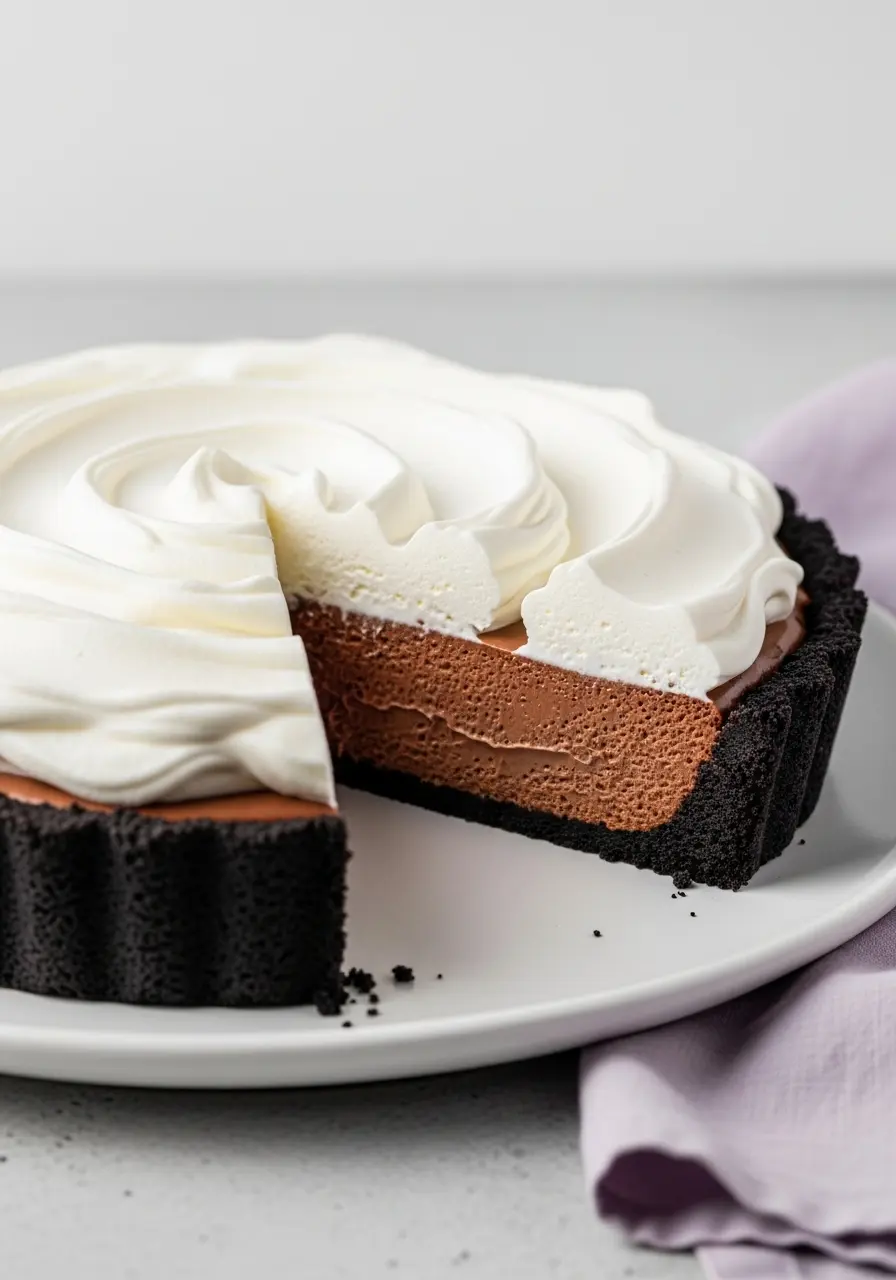
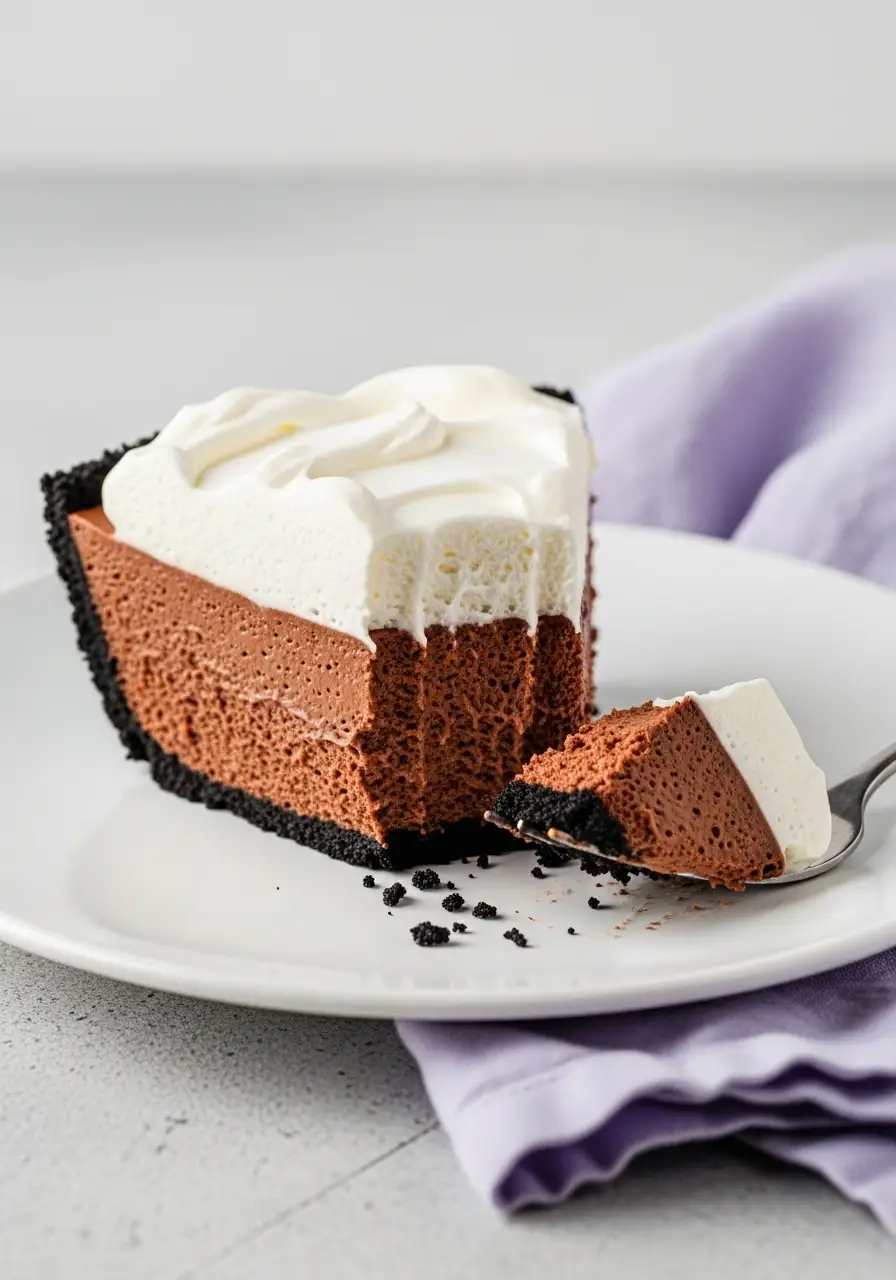
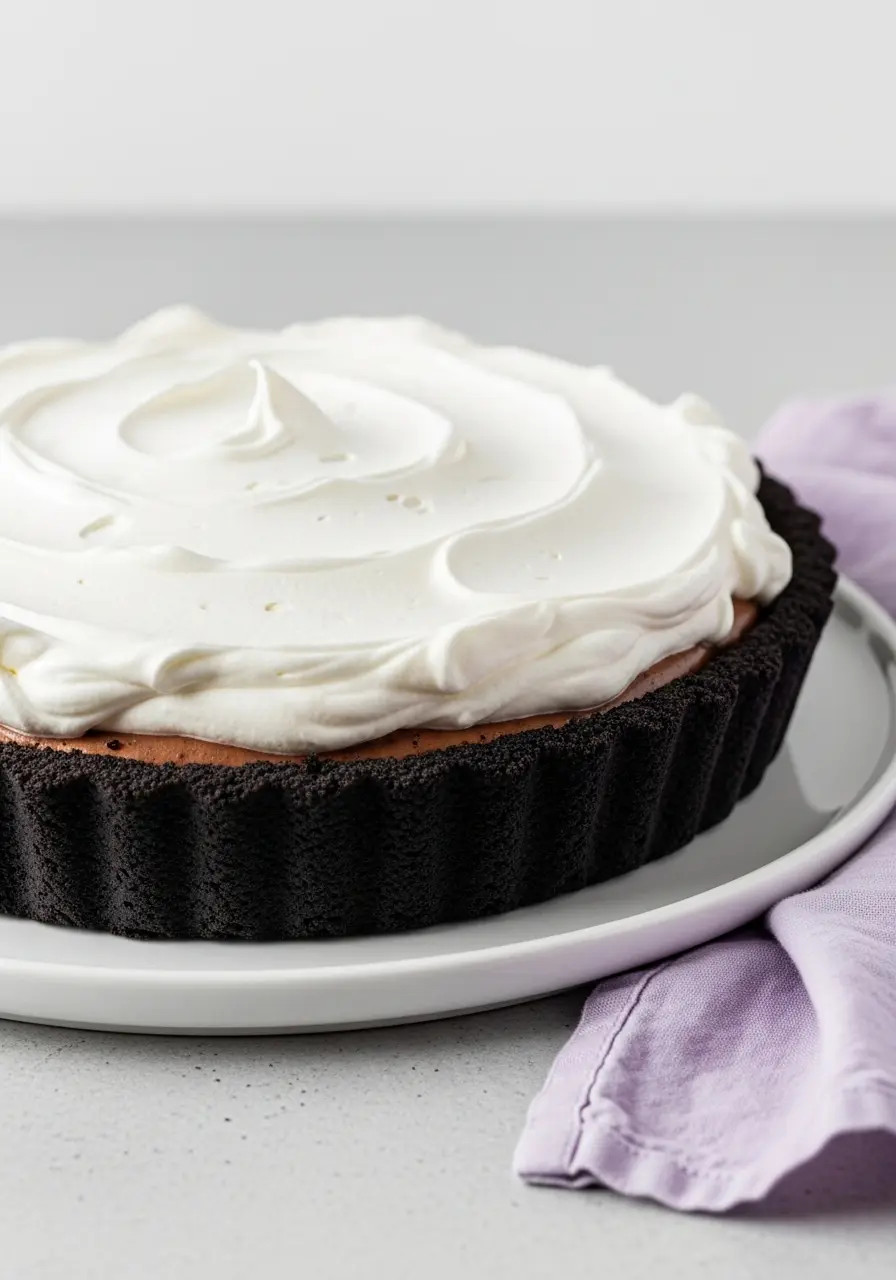
Preheat the oven to 350°F. Crush your Oreos (all that creamy goodness stays in!) until they’re fine crumbs, you can do this in a ziplock bag and smashing with a rolling pin for that “hands-on” vibe. Mix in the melted salted butter until the crumbs feel like wet sand. Press it firmly into the bottom and just a bit up the sides of your pan. Quick tip: pressing with the bottom of a glass works wonders for a smooth, even crust. Bake for about 11 minutes, then let it cool completely, this crust will be your pie’s delicious foundation.
2. Warm the Milk and Cream Gently
In a small saucepan, combine your whole milk and heavy cream. Heat slowly over low heat until it’s just warm to the touch, think warm, not boiling. This gentle heat is key to keeping the mousse ultra-smooth.
3. Temper Your Egg Yolks Like a Pro
In a bowl, whisk together the egg yolks, sugar, and that optional pinch of espresso powder. Slowly pour in the warm milk and cream, a little at a time, whisking constantly. Tip: this step is all about patience, rushing will scramble the eggs, and we want silk, not scrambled eggs!
4. Thicken the Mousse Base
Pour the mixture back into your pan and cook gently over medium-low heat, stirring frequently. Rich and glossy, it should slowly ripple as you stir, not thick like pudding, just that perfect, creamy stage. This is the moment you start seeing your chocolate dreams come to life.
5. Add Chocolate, Butter, and Vanilla Magic
Remove from heat and stir in your chopped dark chocolate and the butter. Allow it to rest for a minute before whisking it into a smooth, even consistency. Add vanilla extract and take a tiny taste, yes, right now.
6. Blend for That Silky Finish
Optional but game-changing: use an immersion blender for about 40 seconds. This creates a mousse so smooth it practically winks at you.
7. Assemble and Chill
Pour the chocolate mixture into your cooled Oreo crust. Smooth the top like frosting a cake. Place the pie in the fridge and let it set for at least 6 hours, overnight is ideal. Trust me, good things come to those who wait!
8. Whip the Cream to Perfection
Whip the chilled heavy cream with powdered sugar and vanilla until stiff peaks form. Little tip: start slow, then gradually increase speed. This gives a fluffy, stable topping without over-whipping. Spoon it over your pie or pipe it for a pretty finish.
9. Serve, Smile, and Savor
Slice carefully, serve, and maybe grab a sneaky forkful before anyone else does, you earned it. Optional: sprinkle a few Oreo crumbs on top for a little extra wow factor.
If you want a different twist on chocolate bliss, try my chocolate mousse cake!
Mistakes to Avoid
Rushing the tempering: Pouring hot cream too fast into the eggs can scramble them. Take it slow, whisk constantly, and you’ll get that silky mousse every time.
Forgetting to level the crust: Uneven crust edges can make slicing messy. Take a few extra seconds to press it smooth.
Assembling before the crust cools completely: Warm crust + mousse = soggy bottom. Patience here keeps the crust crisp.
Using the wrong pan: A springform or a pie pan with a removable bottom works best. Standard pans can make removing the pie tricky.
Other Topping Ideas
- Toasted hazelnuts or almonds: Gives a nutty crunch and a touch of warmth.
- Caramel drizzle: Sweet, silky ribbons that contrast perfectly with dark chocolate.
- Chocolate ganache drops or swirls: Intensifies chocolate indulgence and looks gorgeous.
- Crushed Biscoff or ginger snaps: Adds a spicy-sweet, crunchy layer.
How to Store Chocolate Mousse Pie
Refrigerate for up to 3 days: Keep it covered lightly with plastic wrap or in an airtight container to maintain the mousse’s creamy texture.
Avoid freezing the whole pie: Mousse can get grainy if frozen; instead, freeze individual slices if needed.
Store whipped cream separately if possible: Keep it fluffy and fresh, add it right before serving.
Keep away from strong odors: Chocolate absorbs smells easily, so store away from onions, garlic, or heavily scented foods.
More Delicious Pies to Bake
Creamy Chocolate Mousse Pie with Oreo Crust
Ingredients
For the Oreo Cookie Crust
- 26 Oreo cookies with the cream
- 5 tablespoons salted butter melted
For the Chocolate Mousse
- 4 egg yolks
- ⅓ cup granulated sugar
- 1½ cups whole milk
- 1½ cups heavy cream
- 2 cups 12 oz dark chocolate, chopped
- 2 tablespoons salted butter
- 2 teaspoons vanilla extract
- Pinch of espresso powder optional
For the Whipped Cream Topping
- 1 cup chilled heavy cream
- 5 tablespoons powdered sugar sifted
- 1½ teaspoons vanilla extract
Instructions
- Preheat your oven to 350°F. Crush your Oreos (cream included!) into fine crumbs. Mix in the melted salted butter until the crumbs feel like damp sand. Press the mixture firmly into the bottom and up the sides of your 9 inch (springform pan or pie dish with removable bottom). Tip: pressing with the bottom of a glass makes a nice, even surface. Bake for around 11 minutes, then let it cool completely so it’s ready to hold your chocolatey filling.
- Add both the whole milk and heavy cream to a small saucepan. Warm it gently over low heat until it feels pleasantly warm to the touch, just cozy, not boiling. This gentle heat helps create a perfectly smooth mousse.
- In a mixing bowl, whisk together the egg yolks, sugar, and the optional pinch of espresso. Slowly add the warm milk and cream, a little at a time, whisking constantly. Take your time here; it keeps the eggs from curdling and ensures your mousse will be silky.
- Return the mixture to the pan and cook gently over medium-low heat, stirring often. You want it to thicken just a little and become glossy and creamy, this is the first glimpse of that dreamy chocolate texture.
- Remove from heat and stir in the chopped dark chocolate and butter. Let it rest for a minute, then whisk until everything is smooth and melted together. Mix in the vanilla extract, and go ahead, taste a little to make sure it’s perfect.
- For an ultra-smooth finish, you can give it a quick spin with an immersion blender for 30–45 seconds. This makes the mousse extra creamy and luxurious.
- Pour the chocolate filling into your cooled Oreo crust, smoothing the top with a spatula. Chill in the fridge for at least 6 hours; overnight gives the best set. Good things take time, and this pie is no exception!
- Using a mixer, whip the chilled cream with sugar and vanilla until it thickens into stiff, airy peaks. Start slowly, then increase speed to get fluffy, stable cream without over-whipping. Spread or pipe it over the chilled pie for a beautiful topping.
- Slice with care, serve, and savor every bite, a little sneak taste before anyone else sees it is highly recommended! Sprinkle some crushed Oreos on top if you want a little extra crunch and decoration.