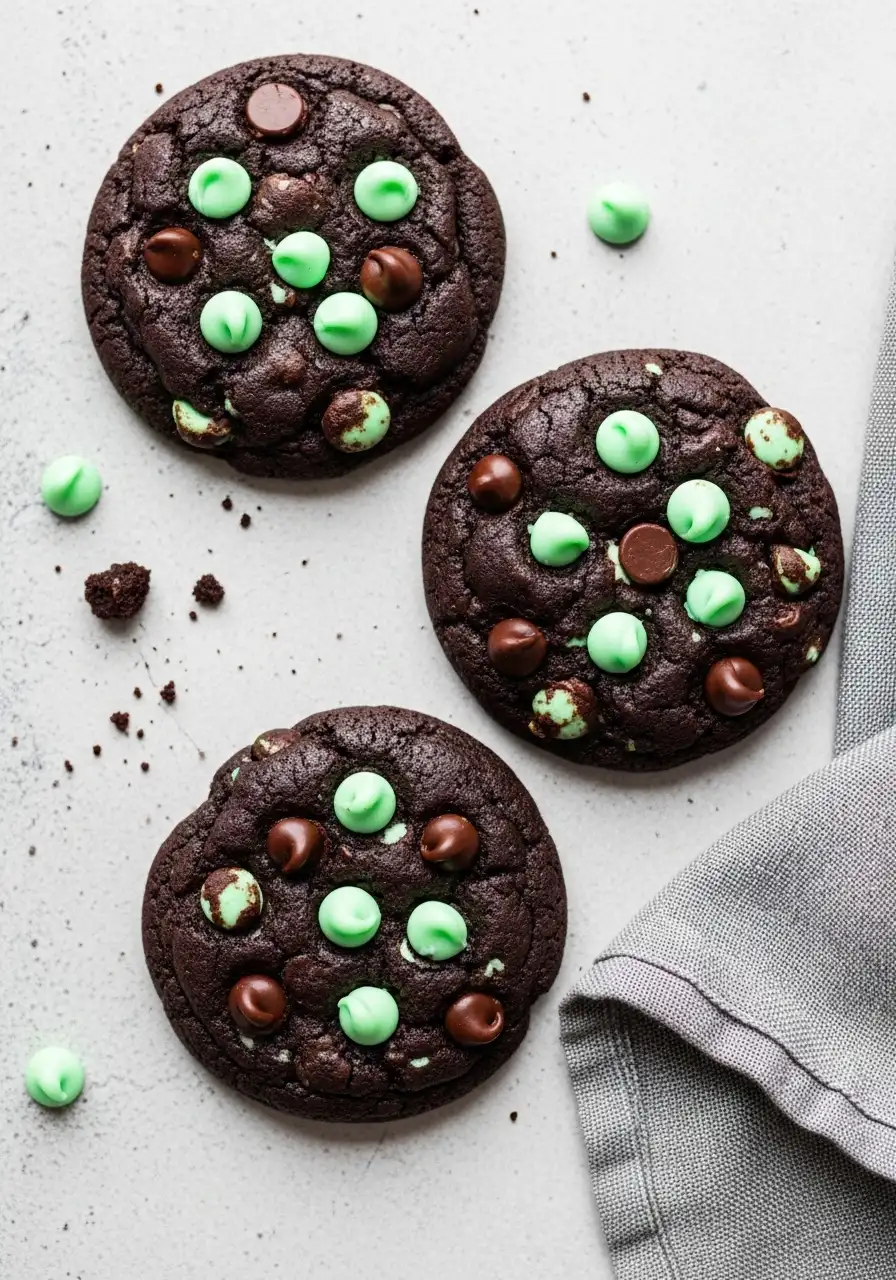
Stop what you’re doing. These Chocolate Mint Cookies are the sweet indulgence your life’s been missing. They’re soft, chewy, loaded with chocolate, and just kissed with mint in all the right places. Baking them feels like magic: no fancy tools, no stress, just you, the dough, and the sweet smell taking over your kitchen. And honestly? These mint cookies are the kind of treat that make people ask, “Wait… did you make these yourself?”
Why Chocolate Mint Cookies Are Totally Worth It
Chewy, fudgy perfection in every bite – soft on the inside, slightly crisp on the edges, just the way cookies should be.
Perfect balance – chocolate-rich without being too sweet, minty without being toothpastey.
Mess-free indulgence – no fancy piping or decorating skills needed; just scoop, bake, and enjoy.
Flexible fun – perfect for gift-giving, a cozy night in, or impressing friends with zero effort.
The Ingredients You’ll Need
- All-purpose flour: This is the foundation of your cookies.
- Baking soda: A tiny ingredient with a big job, it helps your cookies rise just enough while keeping them soft and tender.
- Dark cocoa powder: Adds deep, rich chocolate flavor, it makes the cookies taste decadent without adding extra sweetness.
- Salted butter: Butter gives flavor, moisture, and helps the cookies spread evenly. Salted butter adds a little extra depth to the chocolate.
- Brown sugar: Makes the cookies chewy and soft, while adding a subtle caramel-like flavor that pairs perfectly with mint.
- Granulated sugar: Gives just enough sweetness and helps create a slight crisp on the edges for that bakery-style texture.
- Vanilla extract: Enhances all the flavors naturally, it’s the little boost that makes your cookies taste “homemade cozy.”
- Peppermint extract: Gives the refreshing minty kick that balances the rich chocolate.
- Eggs: Acts like glue, keeping the dough together and giving the cookies a tender, soft center.
- Mint chips: Little bursts of minty goodness that melt perfectly with chocolate for that signature flavor.
- Chocolate chips: Melt-in-your-mouth pockets of chocolate that make each bite indulgent and irresistible.

How to Make Chocolate Mint Cookies
Step 1: Get the base ready
Start by tossing your softened butter into a big bowl (use an electric mixer). Add the brown and granulated sugars and give them a good mix. I like to think of this as making the “fluffy, chewy heart” of the cookie. Cream it until it’s light, soft, and a little dreamy.
Step 2: Eggs and flavor buddies
Crack in the eggs, one at a time, mixing slowly so everything blends into a smooth, rich batter. Now, add the vanilla and peppermint extracts. Just a little peppermint goes a long way, it should tease the chocolate, not overpower it.
Step 3: Dry ingredients meet wet
In another bowl, whisk together the flour, cocoa powder, and baking soda. This keeps the cocoa evenly spread so every bite is perfectly chocolatey. Gradually fold this into your buttery, sugary mixture.
Step 4: Chips for maximum yum
Gently fold in the mint chips and chocolate chips. Here’s a tip: if you love mint, reserve a few chips to sprinkle on top later, it makes them look bakery-level fancy.
Step 5: Chill like a pro
Cover the dough and pop it in the fridge for 30-60 minutes. Chilling helps the cookies hold their shape, and spreads just right.
Step 6: Prep the stage
Preheat your oven to 350°F. Line your baking sheets with parchment paper, this is the unsung hero of perfectly baked cookies. It keeps them from sticking and makes cleanup ridiculously easy.
Step 7: Shape like a champ
Scoop out dough balls (about 2 inches) and place them spaced apart. I like to gently roll them in my hands so they’re smooth, it gives the cookies a polished look even before they’re baked.
Step 8: Bake with a twist
Bake the cookies for 6 minutes first, then pull them out and press a few extra chocolate and mint chips on top (if you save some). This little trick makes them pop visually and ensures melty, chocolatey bites in every cookie. Bake 4–5 minutes more until the edges are set but the centers are soft.
Step 9: Cool, admire, devour
Let the cookies rest on the pan for a few minutes, then transfer to a wire rack. This gives the centers time to firm up just enough while keeping them chewy. Grab one, take a bite, and savor that chocolatey-minty hug.
Can’t get enough of that chocolate-mint combo? You’ll love my mint chocolate cake, it’s everything you adore about these cookies, but in a rich, sliceable cake that’s perfect for sharing.

Things to Avoid While Baking
Overmixing the dough: Once you add the flour, stop mixing as soon as it’s combined. Overmixing = dense cookies. Keep it tender and soft!
Baking too long: Take them out when the edges are set but centers still look soft. Cookies continue cooking while cooling, so don’t wait for them to look “done” in the middle.
Ignoring ingredient temperature: Butter and eggs at room temp mix better and give you a smoother, creamier dough. Cold eggs or butter? You’ll end up with uneven texture.
Using super-hot baking sheets: Warm sheets from a previous batch can make cookies spread too much. Always cool the sheet or use fresh parchment.
How to Store Your Chocolate Mint Cookies
Keep them cozy at room temp: Store in an airtight container for up to 5 days. Tip: tuck in a fresh slice of bread or a few marshmallows, it keeps cookies soft and chewy like they just came out of the oven.
Freeze for future cravings: Pop unbaked dough balls in the freezer on a tray first, then transfer to a bag. Whenever the cookie urge hits, bake straight from frozen, perfectly soft and chocolatey every time.
Revive soft centers: Stored cookies can sometimes firm up, a quick 5–10 second microwave zap or a few minutes in a warm oven brings them back to chewy perfection.
More Delicious Ideas

Chewy Chocolate Mint Cookies
Ingredients
- 2 ½ cups all-purpose flour spooned & leveled
- ¾ teaspoon baking soda
- ¾ cup dark cocoa powder
- 1 cup salted butter softened
- 1 ½ cup brown sugar
- ⅓ cup granulated sugar
- ½ teaspoons vanilla extract
- ¼ teaspoon peppermint extract
- 2 large eggs
- 1½ cups mint chips
- ¾ cup chocolate chips
Instructions
- Start by adding your softened butter to a large mixing bowl, then toss in the brown and granulated sugars. Beat them together until the mixture is light, fluffy, and creamy, this is the foundation of your chewy, melt-in-your-mouth cookies.
- Add the eggs one at a time, mixing well after each, then stir in the vanilla and peppermint extracts. A little peppermint goes a long way, giving your cookies that refreshing hint that complements the chocolate perfectly.
- In another bowl, whisk together the flour, cocoa powder, and baking soda to make sure everything is evenly combined. Slowly fold the dry ingredients into the wet mixture, stopping once it’s just blended so your cookies stay soft and tender.
- Gently mix in the mint chips and chocolate chips. Save a few to sprinkle on top later if you want your cookies to have that professional, bakery-style look.
- Cover the dough and chill it in the refrigerator for 30–60 minutes. This makes it easier to handle and helps the cookies hold their shape during baking.
- Preheat your oven to 350°F and line your baking sheets with parchment paper. Scoop out walnut-sized portions of dough, about 2 inches each, and place them on the sheets with a bit of space in between. Rolling them lightly in your hands helps them look smooth and polished before baking.
- Bake the cookies for about 6 minutes, then press a few of the reserved chocolate and mint chips on top. Return them to the oven and bake for another 4–5 minutes, until the edges are set but the centers are still soft and chewy.
- Let the cookies cool on the baking sheet for a few minutes, then transfer them to a wire rack to finish cooling. This ensures the centers stay tender while the edges firm up just right. Now grab one and enjoy that perfect chocolate-mint combination in every bite!
Notes
- Use a cookie scoop for uniform cookies, they bake evenly and look extra professional.
- Serve warm with a glass of milk, it instantly takes them to the next-level.