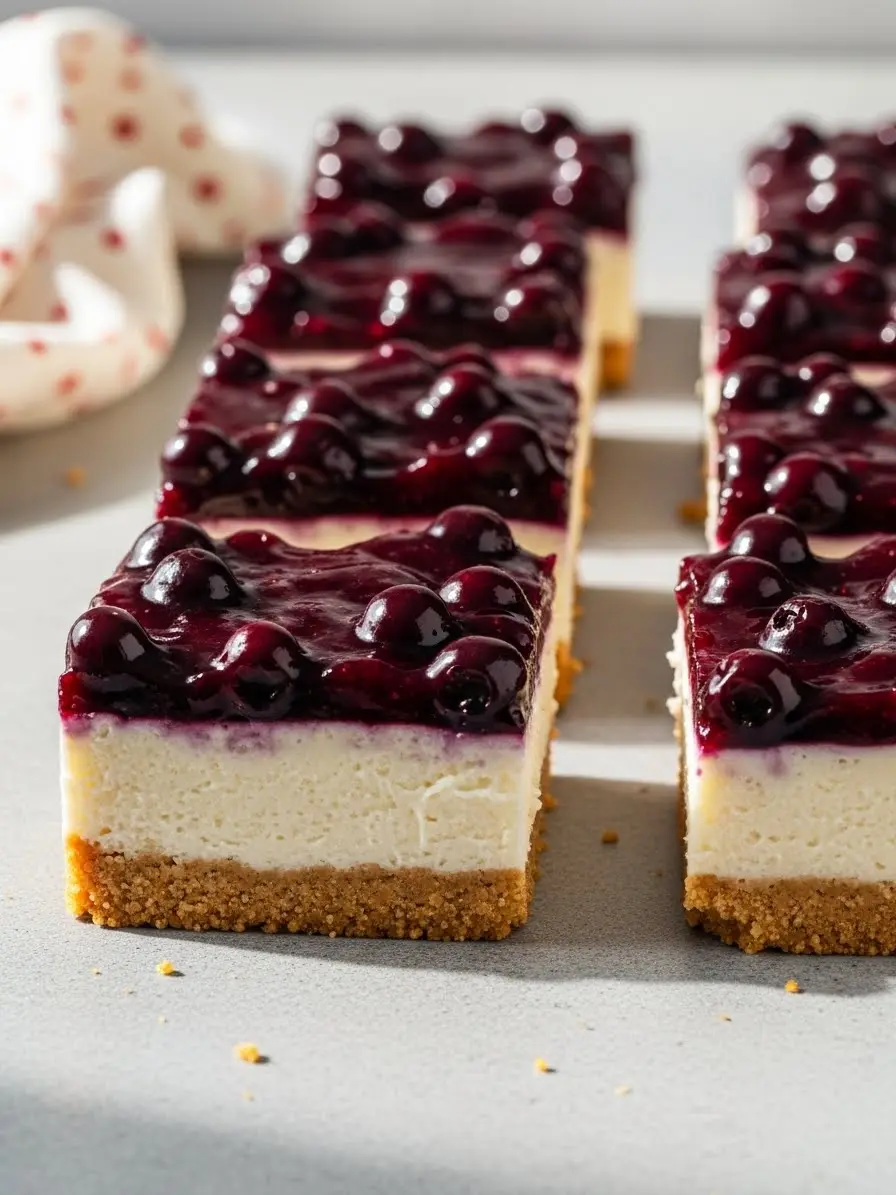
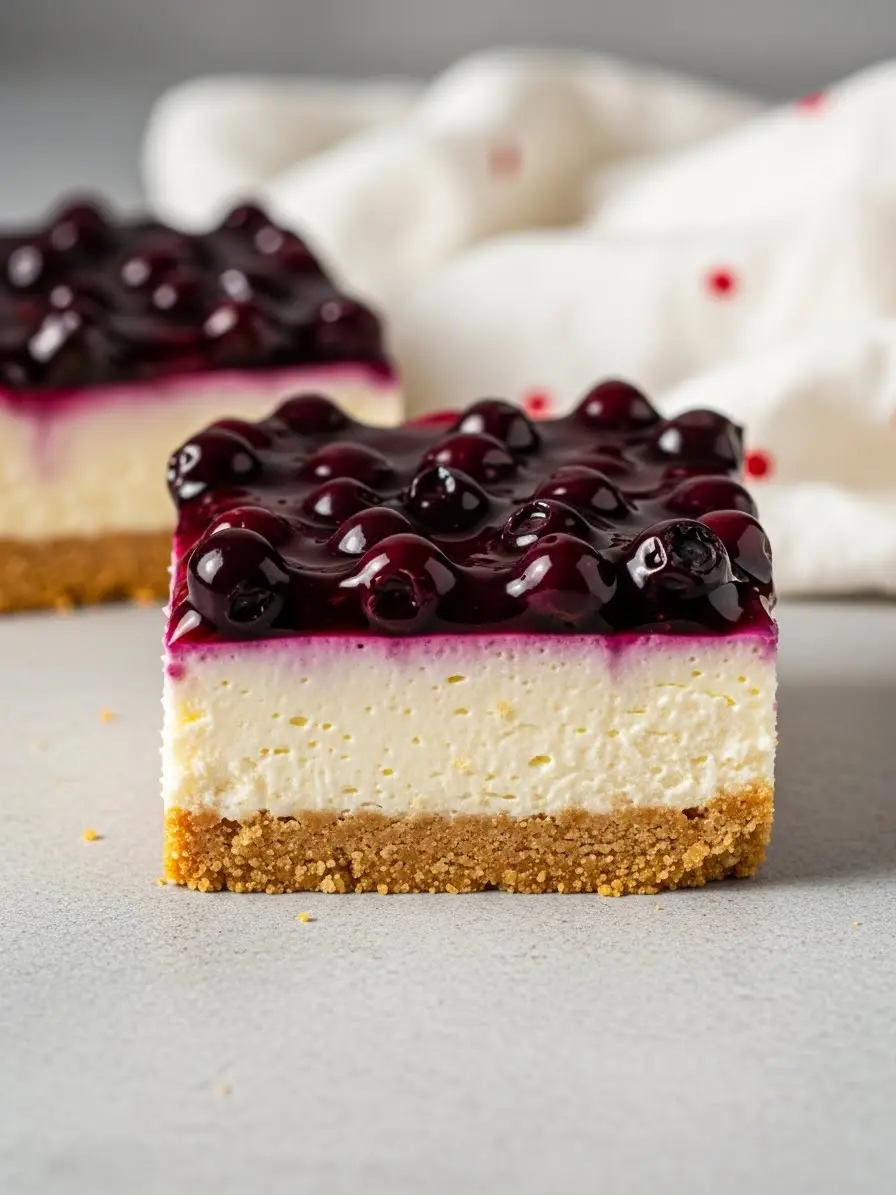
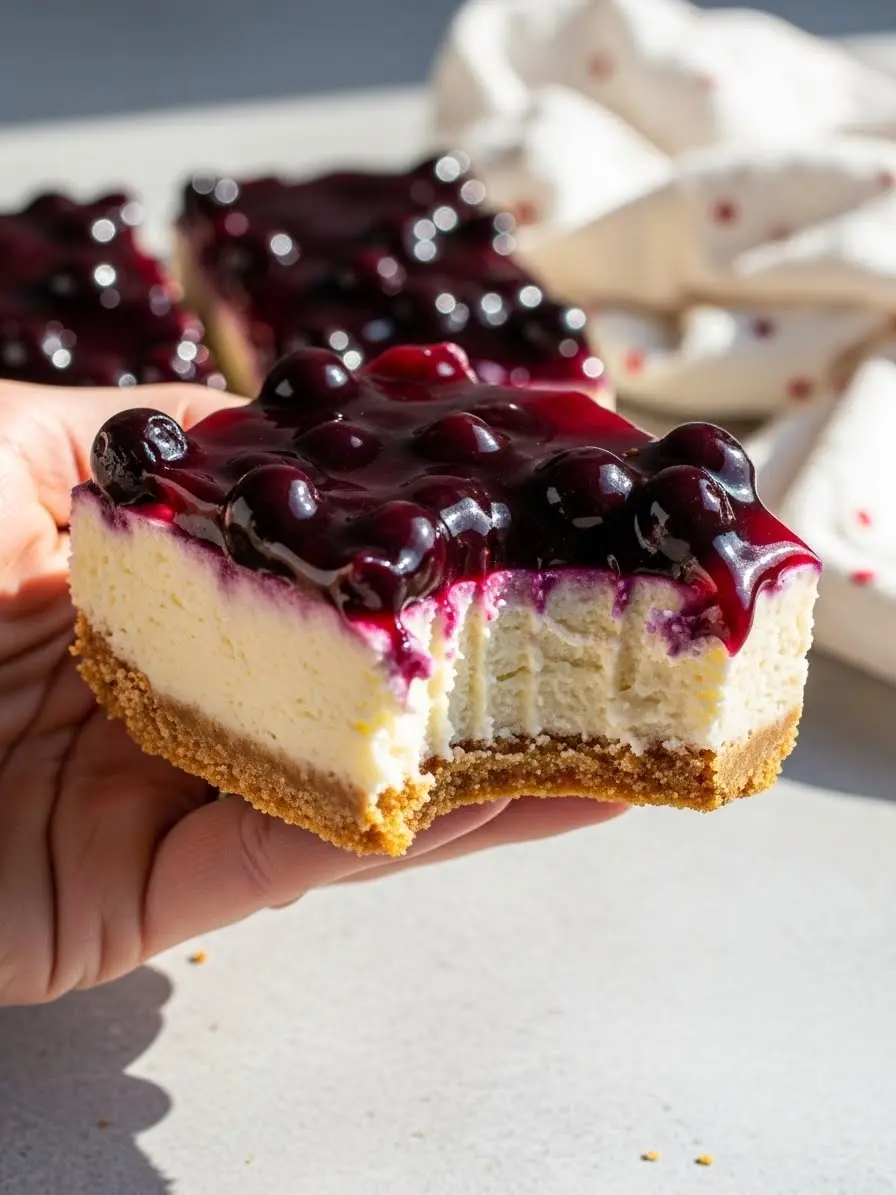
Let’s be honest, some days you want a dessert that feels special without turning your kitchen into a mess. That’s exactly where these Blueberry Cheesecake Bars come in. They’re cool, creamy, and quietly impressive, with a buttery graham cracker crust that holds everything together and a blueberry topping that makes each slice feel like a little reward. This is the kind of recipe you make once, then keep coming back to whenever you need something reliable, comforting, and just a little indulgent.
You’ll love this one because it fits real life. You can make it ahead, let it chill while you do literally anything else, then slice it into perfect bars that look like you tried way harder than you actually did.
If you’re on the hunt for easy blueberry desserts that don’t feel boring or rushed, this one checks every box, simple steps, familiar ingredients, and a result that always gets people asking for the recipe.
Why Blueberry Cheesecake Bars Are a Win
Effortless “wow” factor – You don’t need fancy skills, and yet these bars look straight out of a bakery. Your friends and family will be impressed.
Sweet and tangy in perfect balance – Creamy cheesecake meets juicy blueberry topping for a flavor combo that’s both comforting and refreshing.
Perfect for gifting – Slice them, box them, or keep them in the fridge for late-night cravings… Everyone wins.
The Ingredients You’ll Need
- Graham Crackers: The base of your bars, giving that perfect crunch and buttery flavor, make sure they’re crushed evenly so the crust holds together nicely.
- Brown Sugar: Adds a subtle caramel note to the crust and helps it stick together, don’t skip it, it makes a big difference in flavor.
- Unsalted Butter: Binds the crust and adds richness, melt it first so it mixes evenly with the crumbs.
- Pinch of Salt: Just a tiny sprinkle balances the sweetness and brings out all the flavors, especially in the crust.
- Cream Cheese: The star ingredient for creamy cheesecake filling, room temperature is key for a smooth, lump-free texture.
- Vanilla Pudding Mix: Helps the filling set so your bars hold their shape and adds a gentle vanilla flavor that pairs perfectly with blueberries.
- Powdered Sugar: Sweetens the filling without any graininess, sifting it ensures the cheesecake stays silky smooth.
- Whole Milk: Thins the filling just enough to make it creamy and spreadable, room temperature milk blends best.
- Pure Vanilla Extract: Adds depth and warmth to the cheesecake flavor, a little goes a long way.
- Blueberry Pie Filling: The fruity topping that gives these bars their signature flavor and glossy finish, use a good quality one for the best results.
How to Make Blueberry Cheesecake Bars
Step 1: Crush and mix the crust
Take your graham cracker sheets and crush them until they’re fine crumbs, you can use a food processor, or just smash them with a rolling pin if you don’t have one. Toss in the brown sugar, melted butter, and a pinch of salt. Give it a good stir until it feels like damp sand that will hold together nicely.
Step 2: Press it into place
Line your pan with parchment for easy cleanup, make sure to keep the overhang sides to lift them later easily. Scoop in the crust mixture and press it down evenly with the bottom of a cup, or your fingers if you like that personal touch. Smooth it out as best as you can because this will be the foundation of your bars. Place it in the refrigerator and let it cool for roughly 20 minutes.
Step 3: Whip up the cheesecake filling
In a spacious bowl, mix the cream cheese thoroughly until it’s soft, smooth, and velvety. Add the vanilla pudding mix and powdered sugar, then slowly mix in the milk so everything blends silky smooth. Finish with the vanilla extract for a little extra warmth and depth. Take your time here, mix until it’s completely lump-free. Tiny tip: scraping the sides of the bowl occasionally keeps it creamy all the way through.
Step 4: Layer with love
Spread the cheesecake filling over your chilled crust. Don’t rush it, gently smooth it out so every slice will have an even layer of creamy goodness.
Step 5: Blueberry magic
Spoon the blueberry pie filling on top. You can leave it as a thick layer or swirl it a little with a knife for a fun marbled effect. Fun idea: try dragging a toothpick through the topping in gentle curves, it makes it look bakery-level fancy with zero effort.
Step 6: Chill and wait (the hardest part!)
Pop the whole pan back in the fridge for at least 6 hours to let everything set. This step is key, you want firm bars that slice cleanly.
Step 7: Slice, serve, and savor
Use the parchment overhang to gently lift the entire cheesecake out of the pan. Use a sharp knife and wipe it clean between cuts to get perfect squares. Enjoy!
Avoid These Mistakes
Skipping the chill for the crust: If you don’t let your Graham Cracker Crust firm up, the bars can get crumbly. Tip: press it firmly and chill it before adding the filling, it makes slicing so much cleaner.
Using cold cream cheese: Mixing straight-from-the-fridge cream cheese can give you lumps. Always bring it to room temperature first for a silky, smooth filling.
Ignoring pan prep: Skipping parchment or not greasing the pan slightly can make removal a nightmare. Prep it right, and your bars come out perfectly.
Skipping taste-testing the filling: A quick taste before layering lets you adjust sweetness or vanilla, small tweaks make a big difference.
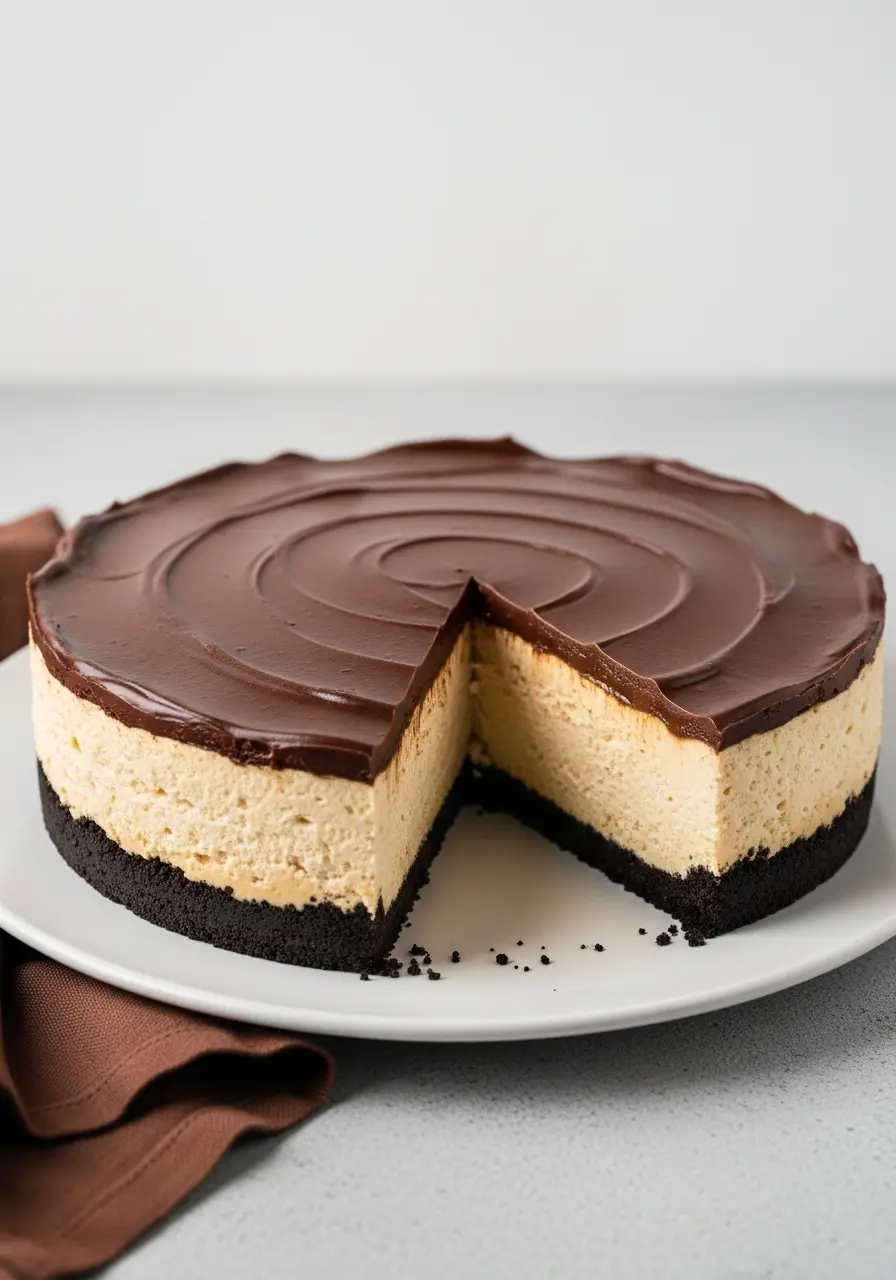
Loving this blueberry version? My Cherry Cheesecake brings the same dreamy creaminess with a pop of juicy cherries, definitely worth a peek.
How to Store Blueberry Cheesecake Bars
Refrigerate in an airtight container: Keeps them creamy and fresh for up to 5 days, perfect for make-ahead desserts.
Layer with parchment between bars: Prevents sticking and makes serving easy.
Keep extra topping separate: If you have leftover blueberry filling, store it in a small jar and spoon on top just before serving for a fresh burst of flavor.
More Blueberry Delights
Easy Blueberry Cheesecake Bars
Ingredients
The Buttery Crust
- 15 whole graham crackers
- 3 tablespoons brown sugar
- 8-9 tablespoons unsalted butter melted
- Pinch of salt
The Cheesecake Filling
- 16 oz cream cheese full fat
- 1 3.4-oz package instant vanilla pudding mix
- ⅔ cup powdered sugar sifted
- 1 cup whole milk room temp
- 1 tsp pure vanilla extract
- 1 can blueberry pie filling for topping
Instructions
- Crush your graham cracker sheets until they’re nice and fine, you can smash them with a rolling pin, a heavy cup, or even pulse them quickly in a food processor. Toss in the brown sugar, melted butter, and a pinch of salt, and stir until the crumbs feel like damp sand that holds together when pressed.
- Line your pan with parchment, leaving extra on the sides so you can lift the bars out later without any struggle. Press the crust mixture evenly into the pan using a cup or your hands, smoothing it down as best you can, this is the foundation for all that cheesecake magic. Pop it into the fridge for about 20 minutes so it firms up nicely.
- While the crust chills, beat the cream cheese in a large bowl until smooth and creamy. Sprinkle in the vanilla pudding mix and powdered sugar, then slowly add the milk while mixing, until everything blends into a silky, lump-free filling. Stir in the vanilla extract for a warm, comforting flavor, and don’t forget to scrape the sides of the bowl every now and then to make sure every bit is evenly mixed.
- Carefully spread the cheesecake filling over the chilled crust, taking your time to smooth it into an even layer, this step is where you set up those perfect bars.
- Top the cheesecake with the blueberry pie filling. You can leave it as a thick, glossy layer or swirl it gently with a knife or toothpick to create a simple, elegant marbled effect. Little touches like this make it look like a bakery creation without extra effort.
- Chill the pan in the fridge for at least six hours, or until the cheesecake is fully set. This step is key to getting firm, sliceable bars that hold their shape.
- When it’s ready, use the parchment overhang to lift the entire cheesecake from the pan. Slice with a sharp knife, wiping it clean between cuts for neat squares, and enjoy the creamy, fruity perfection you just made.
Notes
- Bars taste even better the next day, so feel free to make them ahead.
- If your blueberry topping is too thick, gently stir in a teaspoon of juice to loosen it.
- You can swap in your favorite cookie crumbs for the crust if you want a twist.